
The reference: every feature, what it does, how to use it and what it will not do, area by area. For a first walk through the editor, see First steps; for a task start to finish, the How-to guides; for why it works as it does, Understanding the editor. Every key, every setting and every row of the
/palette are listed on their own in Keyboard shortcuts, Every setting and The / catalogue. The pictures are taken from the editor itself; the project in them is a small garden journal.
Menus are written Menu › Submenu › Item. File is the menu of the
document you are in, Project the one of the folder you opened, Editor
the one of the program itself. Most markdown commands are also rows of the
markdown pane (Ctrl+Shift+M).
The window, in one picture:
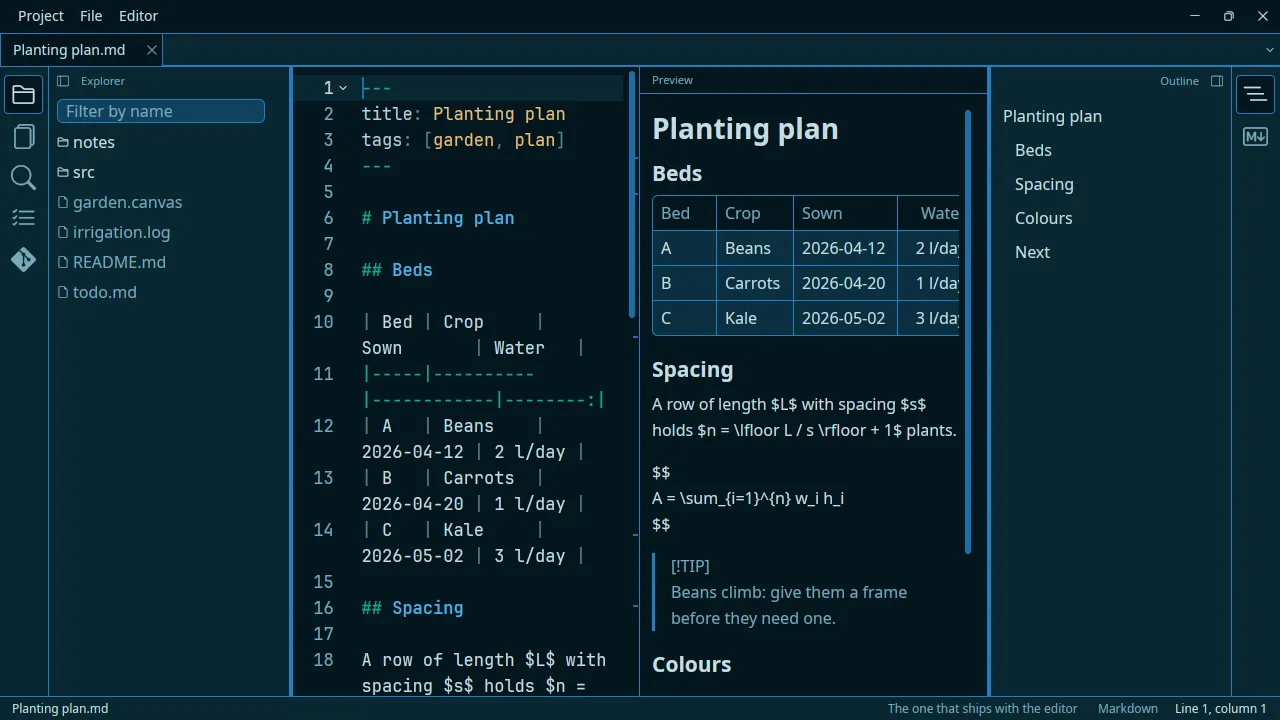
- The rails, the thin columns at both edges, hold one icon per pane. Click
one to open its pane, click it again to close it. Which pane sits on which
side, and in what order, is yours to set —
rail_orderand the*_sidesettings. - The tabs across the top are the documents open in this window. A window
holds one project; Editor › New window (
Ctrl+Shift+N) opens another. - The text, and beside it the live preview (
Ctrl+Shift+B), or the preview instead of the text (Ctrl+Shift+V). Side by side, each follows the other heading by heading. - The status bar names the file, the stylesheet the preview uses — click it to choose another — the language, and the cursor’s place.
Writing
Bold, italic, struck through
Select some text and press Ctrl+B (bold), Ctrl+I (italic) or
Ctrl+Shift+X (struck through) — or File › Emphasis. The selection
is wrapped in **…**, *…* or ~~…~~; pressing the same key again takes
the marks off, and the selection stays where it was. With nothing selected,
the marks are written and the caret goes between them, ready for the word.
- There is no underline: markdown has none.
- Italic is written
*…*, never_…_, so the formatter does not undo it.
Lists that continue themselves
In a list item, Enter starts the next item at the same level: the same
bullet, the next number, or an empty box - [ ] in a checklist. What stood
after the caret moves into the new item.
- Type
- milkand pressEnter: a new-is waiting. - Press
Enteron that empty item: it moves one level up. - Press
Enteron an empty item at the top level: the list is over and the line is left empty.
Shift+Enter breaks the line without starting an item. Inside a fenced
code block, Enter is just a new line.
Formatting a file
File › Format this file (Ctrl+Shift+I) rewrites the document in its
language’s usual style. Markdown, JavaScript, TypeScript, JSON, CSS, HTML,
XML, Vue, YAML, TOML and PHP are formatted by the editor itself, with
nothing to install; Rust, Go, shell and Python use rustfmt, gofmt,
shfmt or ruff when they are installed. In a project with a
dprint.json, dprint comes first for every language but markdown.
- A file that is already formatted is left alone, and the status line says so. A file that does not parse is not touched, and the error is shown.
- In markdown, tables are aligned, lists and headings made regular, and a
subscript such as
H~2~Ois kept as written. - Settings:
tab_size,insert_spacesandline_widthapply to every language;format_wrap_text = truealso re-wraps long paragraphs;format_on_save("off","embedded","always") formats on each save.
Checking spelling
File › Check spelling underlines with a wavy red line every word of the prose that the dictionary does not know. The status line says how many and in which dictionary.
- Open a markdown document and choose File › Check spelling.
- Correct a word: the underlines are brought up to date at each pause in your typing.
- Choose Check spelling again to turn it off.
- What is checked: the prose only — not code, HTML, maths, front matter,
a link’s address, a wikilink’s file name, a
#tag, or a word with a digit or an_in it. - The language: the document’s front matter
lang:(fr,en-GB…), otherwise the editor’s language. - What it needs:
enchant-2and a dictionary for that language (hunspell-fr,hunspell-en-us…). Without either, the status line says which is missing and the check turns itself off. See Install. - Limits: no suggestions and no personal dictionary yet; grammar is not checked. The check belongs to the one document it was turned on in.
The / palette
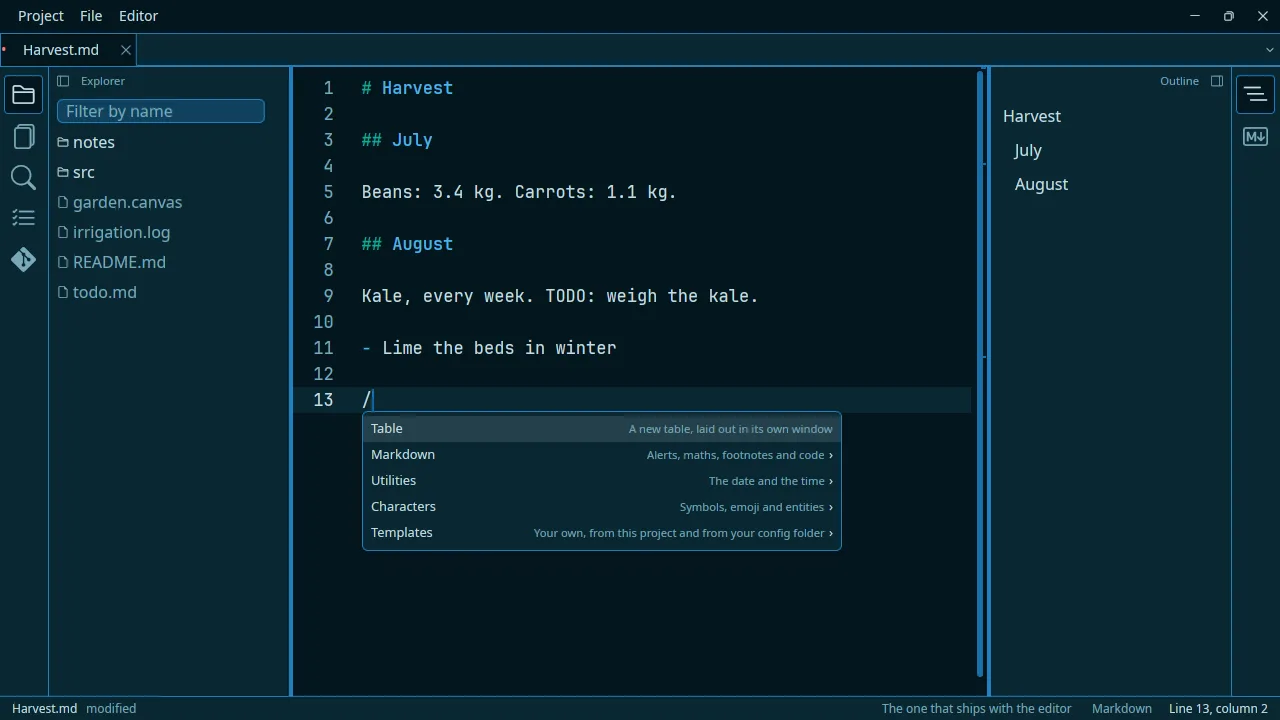
Some markdown is quick to type and some is not. A callout is four brackets, an exclamation mark and a word in capitals; a footnote is a reference in one place and its note in another; a table is three lines of pipes before it holds anything. The palette is for those.
Opening it
In a markdown document, type / at the start of a word — at the start of a
line, or after a space. A list appears under the cursor, and typing narrows it.
/tab          → Table
/note         → Note · Note (folded)
/fold         → the five folded alerts
/alert        → all ten alerts
Matching is on the name you can see, in the language you are reading, so /tab
finds Table in English and Tableau in French. A word anywhere in the
name counts, which is how /fold reaches Note (folded).
Two ways in, and they are different on purpose
A bare / browses. It shows the level you are on — four rows at the top,
four under Markdown, ten under Alerts — and a row with a › opens its own
rows instead of writing anything. ‹ at the top of the list, or Escape, comes
back out.
Anything you type searches the lot, flat. One letter after the / and the
level stops mattering: every row that writes something is a candidate, wherever
it lives. /note still lands on Note in one keystroke, from anywhere.
That is why the second level costs nothing. A submenu is what makes a list unsearchable, and this one never is: the tree is the map and typing is the shortcut, and nothing is reachable by one and not by the other.
A group’s name is a query too. A row matches on the names of the groups
above it as well as its own, so /alert offers the ten alerts and /util
offers the date and the time — a whole branch without walking it.
Ignoring it
Typing never commits anything. That is the rule the rest is built on, and there is nothing to learn in order to rely on it:
- type a word that is not a command and the list goes —
/frobnicateis just a word, and every character of it stays where you typed it; - type a space and the list goes, because a slash and a word is prose;
- press
Escapeand the list goes, keeping the/and everything after it — and inside a groupEscapecomes back out of it first; - click anywhere else and the list goes.
A / in the middle of a word never opens it at all, so /home/user and
le 12/09 are only ever text.
Choosing something
Enter, Tab, or a click. The arrows move through the list and wrap round at
each end. Whatever you chose replaces the / and what you typed after it, in
one step — one press of undo puts /table back exactly as it was.
On a row with a › the same keys open it instead, and nothing is written.
What is in it
A bare / offers four rows:
| Table | A new table, written into the document and opened as a grid. The same table the Insert table command writes |
Markdown › |
Alerts, maths, footnotes and code |
Utilities › |
The date and the time |
Characters › |
The symbols and emoji you used last, and all of them — see Characters |
Markdown ›:
Alerts › |
The ten, below |
| Heading | As deep as the heading above it — see below |
| Bold, Italic, Strikethrough | **…**, *…*, ~~…~~, with the cursor between the marks |
| Quote | A quoted line, opened with > |
| Link, Image | […]() and ![…](), with the cursor in the first pair |
| Link to a file, Embed a file | [[…]] and ![[…]] — a file by name, and a file’s contents in the page |
| Link to a new file | [[…]] that makes the file it names when there is none — below |
| Maths | A display formula between $$ and $$, and the formula window open on it |
| Footnote | A reference where you are — it asks which note first; see below |
| Code block | A fence, with the cursor on the language |
| Front matter | A block of keys at the top of the file — see below |
Markdown › Alerts ›:
| Note, Tip, Important, Warning, Caution | The five alerts |
| The same five, (folded) | The alert written > [!NOTE]-, which starts shut and opens on a click |
Utilities ›:
| Date | Today, as 2026-09-20 |
| Time | The time now, as 14:32 |
Twenty-four rows that write something, one of them a keystroke away and the rest one word away.
Bold and italic are in it, and for a while they were not. Ctrl+B and
Ctrl+I are quicker than any menu — for somebody who knows them. They are no
help at all to somebody who does not yet know that ** is bold, and this list
is largely for learning the syntax, so it would be a strange place to assume
the syntax has been learnt.
Finding a row by a word that is not on it
Matching is on the name you can see, and some rows answer to a second word as
well: /img finds Image, /meta and /yaml find Front matter,
/title finds Heading. A row’s own name always wins over somebody else’s
synonym.
Five rows behave a little differently
Heading comes out as deep as the heading above it. Under an ## it writes
##; under a ###, ###; in a document with no heading yet, #. It is the
only row that reads your document before it writes, and it is there so that you
do not have to keep count of how many levels down you are.
Front matter goes to the top of the file, wherever you asked for it. That is
the only place front matter is front matter — three lines with dashes in the
middle of a document are just three lines. If the document already has a block,
nothing is added and the cursor goes into the one that is there: two ---
blocks is not something any reader of markdown understands.
Table opens the grid on what it wrote. The markup goes into the document first, so it is there whether or not you do anything in the window, and the grid opens on it — which is the same window the Open as a grid command opens, on the table you have just made rather than on one you had to go and find.
Footnote asks which note you mean, because it cannot tell: a footnote is either a new note, which needs its text, or a second reference to one the document already has.
- A new note — type its text. The reference goes where you are and the
definition goes to the foot of the file, numbered with the lowest number not
already in use. A footnote you have named yourself,
[^why-this], is left out of that count. - One already written — pick it from the list, which shows each note’s label and the beginning of its text. Only the reference is written; the definition is not repeated, because two definitions with one label is how a document comes to have two notes with the same number.
Either way the cursor stays at the reference. You were writing a sentence
and the footnote is a mark in it, so the sentence is what you go on writing.
Nothing is written into the document until you answer, so Escape at the
question leaves the /footnote exactly as you typed it. A document with no
footnotes yet is not asked the question at all — it opens straight on the
field.
Date and time are always written the same way, 2026-09-20 and 14:32,
whichever language you are reading the editor in. A date in a note is usually
there to be sorted or searched, and one that changes shape with the locale does
neither.
Where it works
Markdown documents only. Every row writes a markdown construct, and in a Rust or
a Python file / is the start of a comment, a path or a regular expression
rather than a request.
Tables
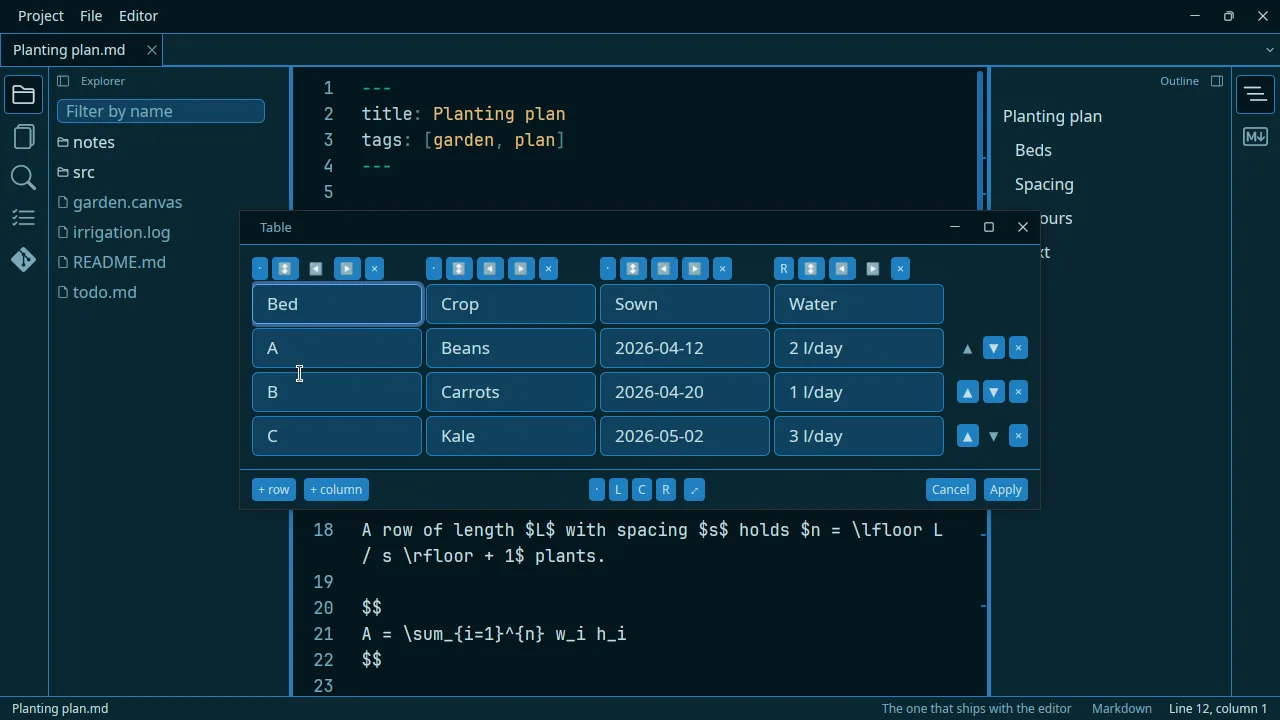
A pipe table is easy to read and miserable to edit: every row has to be changed to keep the columns lined up, and a column added in one row and forgotten in another is a table that stops being one.
The four commands
They act on the table the cursor is in, and each writes it back aligned.
| Insert a table | Three columns and two rows, cursor in the first cell |
| Add a row to the table | The one the cursor is in |
| Add a column to the table | The same |
| Align the table under the cursor | Line the columns up again |
The grid
Ctrl+Shift+T, or Edit the table in a grid in the markdown pane’s Table section, opens the
table the cursor is in as a grid of cells — which is the other way of editing
one, and the way you want when the change is not a single row.
It is a window of its own, a child of the editor’s: move it, resize it, maximise it, put it on your other screen. Your desktop decides where it opens, which is normally centred on the editor, and keeps it in front. While it is open the editor behind it is blocked, so the table cannot move under the grid.
Each cell is a text box, and the buttons around them are what the grid is for.
Above each column, in order: its alignment, as a button that cycles — ·
for whatever the renderer chooses, then L, C, R; its sort; ◀ and ▶
to move the column past its neighbours; and × to remove it. At the end of each
body row: ▲ and ▼ to move the row, and × to remove it.
Along the bottom, between the two buttons that add to the table and the two that
end the conversation: the same four alignments again — ·, L, C, R — each
applying to every column at once, and ⤢, which sizes the window to the
table.
Sorting
The sort button says what it will do. ↕ is a column the table has not been
sorted by; press it and the body is sorted smallest first and the button becomes
↑; press it again for largest first, ↓.
- A column that is entirely numbers sorts as numbers.
1 234,1,234and12%are all numbers, because that is how people write them. One cell that is not makes the whole column text, which sorts case-insensitively. - Empty cells go last whichever way round it is: an empty cell is a gap rather than a value.
- The sort is stable, so sorting by one column and then another keeps the first sort inside the second.
- The header never moves, and neither does the document until you Apply.
Anything else you change — a row moved, a column removed — puts the button back
to ↕, because the rows are no longer in that column’s order.
Aligning the whole table
The four buttons in the footer are the same four alignments as the button above
a column, applied to all of them: press C and every column is centred. They do
not cycle, and that is the difference between them and the per-column button.
A button over one column can show you that column’s state and step through the
four; a button for the whole table has no state to show, because the columns
need not agree — so there are four of them and you press the one you want.
· is the fourth alignment and not the absence of one: it is the column that
says nothing and lets whatever renders the table decide.
Fitting the window
⤢ makes the window as big as the table needs, so that all of it is on screen
with nothing scrolling. It is bounded the same way the opening size is — a table
past those bounds still scrolls, and dragging the window bigger, or maximising
it, is still the way past that.
It does not move the window. Where a window sits is your desktop’s business and yours, and a button that walked the grid back to the middle of the screen every time you pressed it is a button nobody presses twice.
Moving
◀, ▶, ▲ and ▼ move one column or one body row by one place. The button
at the end of the line does nothing rather than wrapping round, so a row cannot
jump from the bottom to the top under your hand. A column carries its alignment
with it.
The header is not a body row, so it has no ▲ or ▼: moving it into the body
would leave the row of dashes describing the first row of data.
What it refuses
- The header cannot be removed. A pipe table without a header is not a pipe table — the row of dashes under it is what makes it one.
- The last column cannot be removed either, for the same reason. The honest way to be rid of a table is to delete its text.
- A pipe typed or pasted into a cell is made safe rather than refused: it
would otherwise open a column the dashes do not have. It goes into the
document as
\|and comes back into the cell as|, so what you see in the grid is what you meant rather than how markdown had to spell it.
Apply — or Ctrl+Enter — writes the table back where it was, aligned, and
leaves everything around it exactly as it was. Cancel, Escape, or the
window’s own close button all write nothing. Closing the editor closes the grid
with it.
A table wider than 24 columns or longer than 200 rows opens in the text rather than the grid, and says so: every cell is a text box, and there is a number of them past which the grid is slower to use than the text it replaces.
The window opens at the size the table asks for, within reason, and the columns share its width down to a floor of about a column and a half of buttons. A table wide enough to pass that floor scrolls sideways — or you can widen the window. A table longer than the window scrolls down, with a bar to say so, and the buttons at the bottom stay where they are.
Its keyboard
Enter |
the next cell, round to the first from the last |
Tab |
the same |
Shift+Enter |
a line break in this cell |
Ctrl+Enter |
Apply |
Escape |
Cancel |
Enter used to be the line break. It is the move now, because that is the way
round filling a grid in actually wants: a line break inside one cell of one
table is rare, and the next cell is every cell.
Lines inside a cell
Shift+Enter in a cell is a line break. A pipe table has nowhere to put a
real newline — it would end the row and split the table in two — so the break is
written into the document as <br>, which is what GitHub renders as a line
break inside a cell and the only way there is to ask for one.
A box shows the source of a cell. Open the grid again and that <br> is
four characters in the box, not a line break — the same way **bold** is six
characters and `code` is six. The grid edits markdown; it does not render
it, and a grid that drew one piece of markup and left the rest as text would be
telling you something untrue about the rest. The one thing it does undo is \|,
which is shown as the pipe it stands for, because that backslash is not markup:
it is a pipe wearing the coat a pipe table makes it wear.
The cells share out the height of the window. Make the grid taller and every cell becomes taller with it, a whole line at a time, so a table of paragraphs is a grid of paragraphs rather than a grid of one-line slots. Make it short and the cells go back to a line each and the table scrolls — a cell shorter than a line has nowhere to draw a cursor.
⤢ is the other end of that rule: it asks for exactly the size at which every
cell is one line.
Tab and Enter both move to the next cell, which is how a grid is typed in.
Two sizes
The editor has three font settings and the grid uses two of them, for different
things. (The third, pane_font_size, is the explorer and the outline; a grid is
not a pane.)
font_size— the size of the text you are writing — is the size of the text in the cells. They hold your prose, so they are as big as your prose is in the editor.interface_font_sizeis the size of everything around them: the buttons, their labels, and how much room a column is given to hold them.
So turning the text up makes the cells bigger without making the buttons bigger, and turning the interface up does the reverse.
Formulas
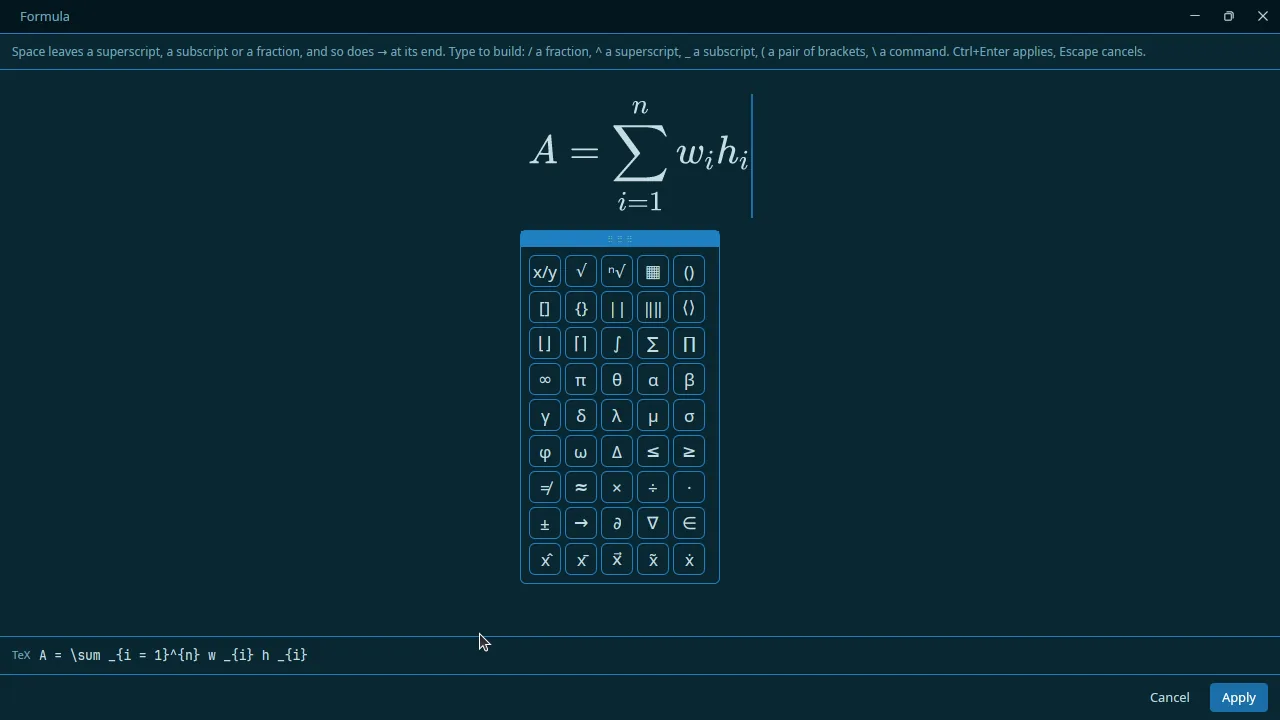
Put the caret inside a formula, $…$ or $$…$$, and press
Ctrl+Shift+L (File › Emphasis › Formula…). A window opens with the
formula drawn as it will be in the preview, and a keyboard of structures —
fractions, roots, sums, matrices, Greek letters.
- Type in the editor, or click a structure to insert it.
- Apply (
Ctrl+Enter) writes the TeX back where it was, in the same form ($…$stays inline). Cancel (Escape) writes nothing.
- With the caret outside any formula, the window starts an empty one:
$$…$$on an empty line,$…$inside a sentence. The same key closes the window. - A formula left untouched writes nothing back. One using TeX the editor cannot read back faithfully — a macro of your own — says so before you type, and you can still cancel.
Colours
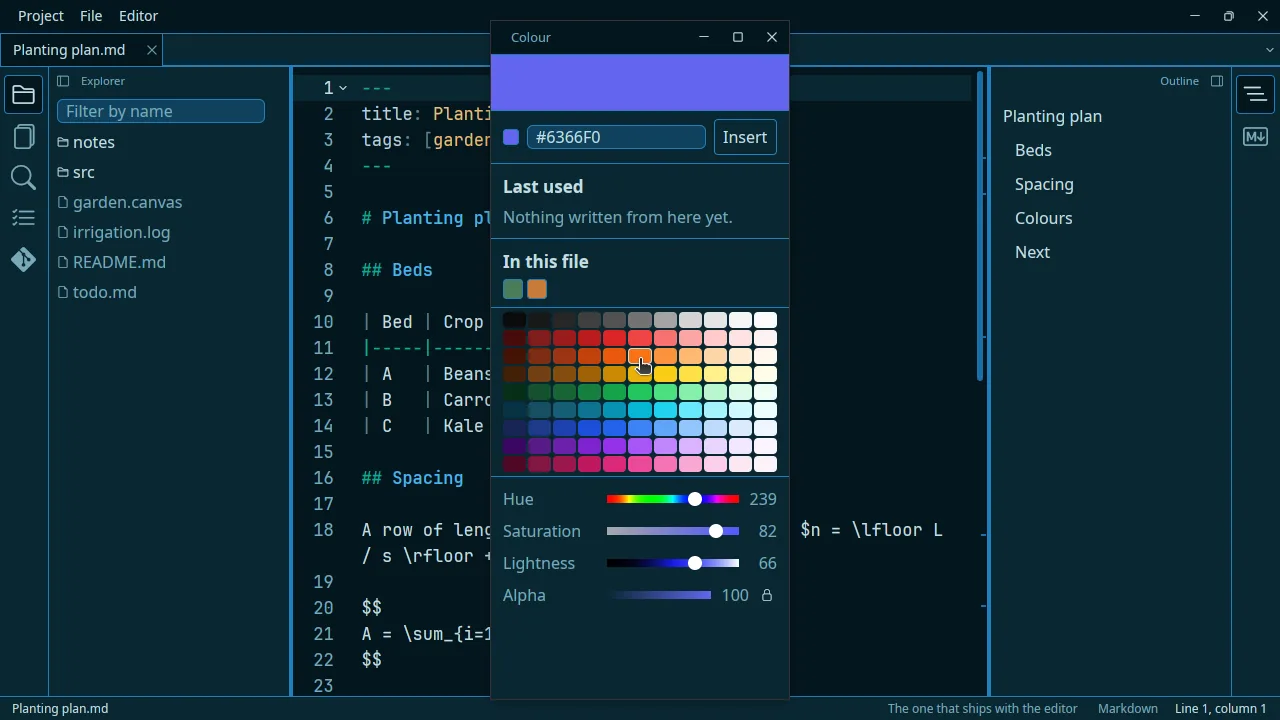
Ctrl+Shift+K (File › Colours) opens the colour window; Insert
writes the colour where your caret was. And in the files where colours are
written, each colour code shows its colour.
A colour code wears its own colour
In a CSS, SCSS, JSON, markdown, HTML, Vue, SVG or XML file, a colour written as #ff8800 — or
#f80, or with an alpha on the end — gets a chip: its # is painted in that
colour, and the code beside it is left in the colour the highlighter gave it.
Nothing is inserted into the file and nothing moves, so the line is exactly as
wide as it was.
Not a square beside the code, which is what other editors draw and what this editor cannot: a decoration here styles text that is already there, and a swatch is a box conjured next to text that is not. Painting one character of the code is as close as that gets — and it is the half that reads well, because the code keeps a foreground chosen to be readable rather than one chosen to sit on the colour.
A colour that is the editor’s own background paints a chip you cannot see —
#04161f in Kaivalya Blue, for instance. A border would answer that, and the
decorations this is built on have none.
Only # colours. rgb() and hsl() are a small grammar with percentages,
slashes and three or four arguments, and a span painted the wrong colour
would be worse than one not painted at all.
The scan runs when you stop typing, with the preview and the outline, so it costs nothing while you type.
The colour window
Ctrl+Shift+K, or /colour in a markdown file, opens it. It reads downwards,
and that is the whole idea of it — pick a colour coarsely at the top, refine
it at the bottom:
| The colour | A band wide enough to judge one grey against another |
| The code | #6366F0, and you can type into it if you have a code to start from. Insert is beside it and writes the colour where your cursor is |
| Last used | The colours you last inserted, newest first |
| In this file | The colours the open file already contains |
| The grid | Nine families by eleven shades, greys along the top |
| Four sliders | Hue, saturation, lightness and alpha, each with its own gradient under the handle and its number on the right |
With a whiteboard in front, Insert colours what is selected on it instead
of writing a code: a board has no cursor, and JSON Canvas keeps any #rrggbb.
One click on any swatch loads it everywhere — the band, the code and all four sliders move to it — and two clicks insert it. Nothing else writes to your document, so a click is always safe to make: the sliders then adjust what the click loaded.
Alpha opens locked at 100, with a padlock beside it. A colour picked from a
pane is almost always meant to be opaque, and a transparent one is a code you
cannot see the point of — #6366F000 reads as a bug rather than a choice. Open
the padlock and the slider moves; the code grows two digits to #rrggbbaa when
it does, which is the only thing that ever lengthens it. That is also why there
is no format switch: there is nothing to switch between.
Last used is remembered per project, in the same file that remembers which tabs were open — so the colours of the thing you are making come back tomorrow, and another project’s do not appear in them. A file opened on its own, with no folder behind it, has no project to remember for, and the strip starts empty.
In this file is the half worth having: the usual question is not “what colour shall I invent” but “what was that blue I used at the top”.
It is a window of its own (colour_as = "window"), which you can keep
beside a stylesheet: Insert still writes where your cursor is in the file you
opened it from. It opens over the editor’s window and Escape closes it.
colour_as = "pane" docks it instead, as a pane of its own rather than
part of the markdown pane — a stylesheet is exactly where somebody picks a
colour, and the markdown pane is not offered in one; the whole pane scrolls,
so a narrow dock shows it all. show_colour puts its icon on the rail and
colour_side chooses the edge; Ctrl+Shift+K opens it either way.
Characters and emoji
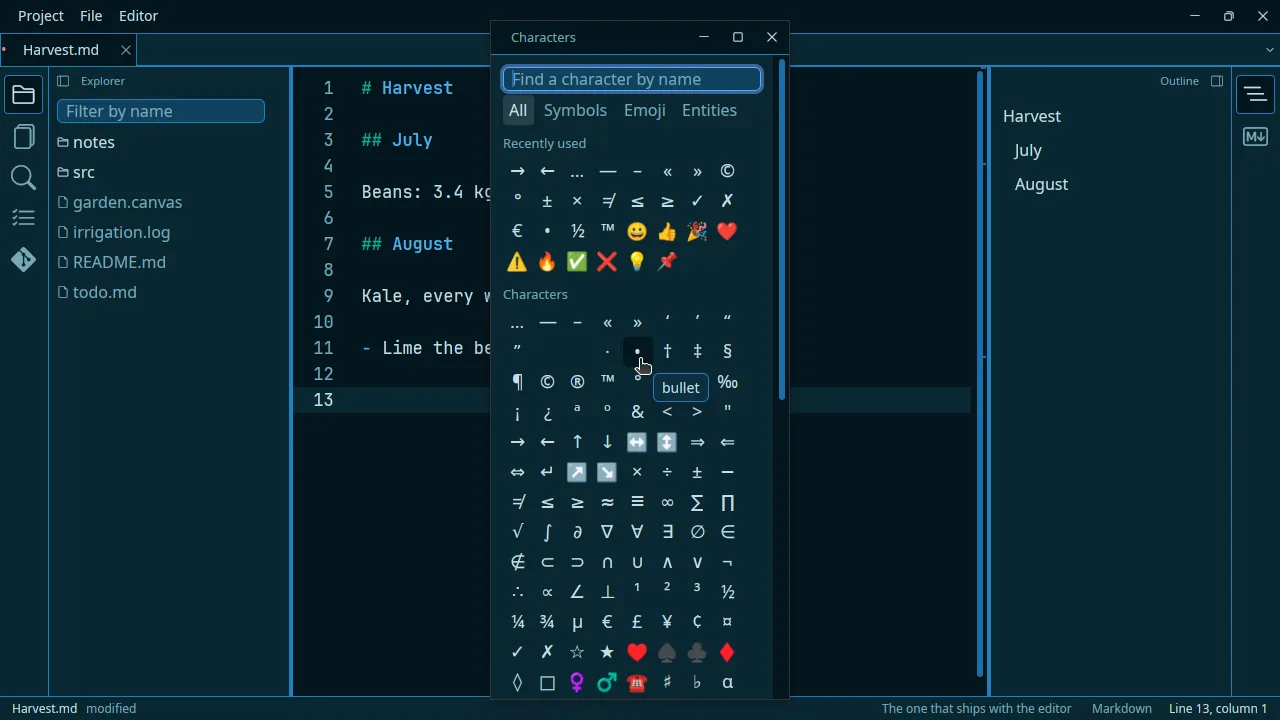
Ctrl+Shift+Y (File › Characters and symbols) opens every character
you cannot type: arrows, maths, currency, typography, emoji, and HTML
entities. Search by name — symbols in English or French, emoji in English —
and click to insert. The ones you used last come first.
- Symbols and Emoji insert the character itself (
→,🌱); Entities insert its HTML name (→), which every markdown reader turns back into the character. - Settings:
characters_as = "window"or"pane",characters_side.
In the palette and in the window
The characters a keyboard does not have — arrows, dashes, guillemets, ©, ½,
π, and every emoji — in two places that share one catalogue.
In the palette, three ways:
- By name:
/arrow,/smile,/copyright. Three letters or more, and the characters come after the palette’s own rows, eight at most, so they never push a row you were typing towards down the list. - By kind:
/emoji,/symbol,/entit— that kind, the ones you used last first. The first row of/emojiand/symbolis Emoji… or Symbols…, which opens the characters — on All, like All characters…: the word is how you found the row, not a filter. - Browsing: Characters
›shows the ones you used last, then All characters…, Symbols… and Emoji….
The characters pane, behind the smiling face on the rail — on the right by
default, show_characters and characters_side in your settings — holds them
all, in any file, code included: a search box, a row of kinds — All, Symbols, Emoji, Entities — the
thirty you used last, then everything the search finds. One click writes the
character where the cursor is, over anything selected; its name is in its
tooltip.
Or in a window of its own: characters_as = "window" in your settings. The
same icon and the same palette rows open it, and it stays open beside your text
while you write; a click still writes where your cursor is in the document you
opened it from. It opens over the editor’s window, Escape closes it, and it
closes with that window. Its rail icon is optional: show_characters = false
takes it off the rail, and the palette still opens the window.
What each kind writes:
| Symbols | the character itself — →, ©, ½. It works everywhere, in every program that opens the file |
| Entities | the same symbols as HTML names — →, ©. They are the character in every view and in an export, and the file stays plain ASCII |
| Emoji | the emoji itself, from Unicode’s full list |
The thirty you used last are kept per project, and start filled with the
classics — →, …, —, «, », ©, ✓, 👍, 🎉 and more — so the list is
useful the first time; each character you use pushes one of those off the end.
Symbols and entities are named in your language and found by their English
names and their entity names too (rarr). Emoji are named in English only,
because that is the set Unicode’s names come in here. They are drawn in this
editor with whatever glyph the system’s fonts offer first, which is sometimes a
plain outline rather than the colour picture; what goes into the file is the
emoji itself, and anything that shows emoji in colour shows it so.
:smile: shortcodes are not here: they are not markdown, and nothing this
editor renders — nor most of what reads markdown — turns them into a picture.
Paste from history
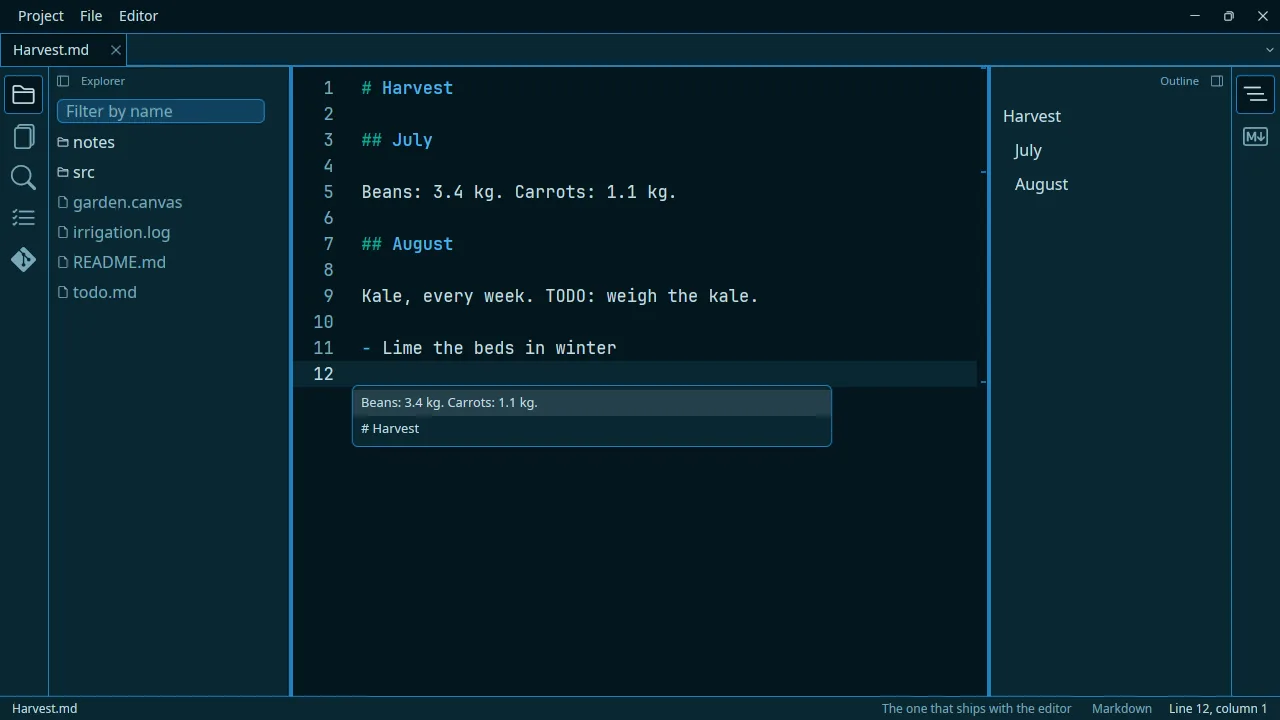
Alt+V (File › Edit › Paste from history…) opens, at the caret, the
last things you copied or cut in this window, newest first. Arrows to
choose, Enter to paste, Escape to close. What is on the clipboard now,
copied from another program, is at the top.
- Kept in memory only, never written to disk, gone when the window closes.
- Setting:
clipboard_history(20) — how many;0turns it off.
Local history
Each save keeps a version of the file, on this machine and never in the
project — nothing to gitignore, nothing in git status. File > Local
history opens them in a tab: the versions on the left, newest first, each with
its time and size; the one you pick on the right, side by side against the file
as it is now. It opens on the newest version that differs from the file, which
is usually the one you came for.
Restore this version puts it back: the file is rewritten and any tab holding it shows the change. It is refused while that tab has changes you have not saved, because the restore would throw them away. A restore is itself a version, so it can be undone from the same list.
- The same text twice is kept once: a save that changed nothing adds no version.
- Before the first save, the file as it was is kept too — and so is any change something else wrote to it between two of your saves, timed by when it was written.
- The newest 50 per file are kept, and none older than 30 days —
local_history_keepandlocal_history_days, where 0 means no limit of that kind. Old versions go when a project opens, even for a file nobody saves again.
The versions live in ~/.local/share/kaivalya-editor/history/, a folder per
file with its path written inside, each version a plain text file you can read
with anything.
local_history = true      # false: no version is kept
local_history_keep = 50
local_history_days = 30
Pasting a screenshot
Copy a screenshot, then press Ctrl+Alt+V (File › Paste an image)
in a saved markdown document. The image is written, in the clipboard’s own
format, into an images/ folder beside the document and a link to it is inserted at the
caret. An image file dragged onto the text is linked the same way. See
Pasting a screenshot.
- Setting:
paste_image_folder("images"; empty writes beside the document). - A new document must be saved first: there is no “beside it” yet.
Links to other files
Type [[ for a wikilink or ]( after a link’s text, and the files
beside the document are offered as you type; the link, once written, is
followed as described below.
Completing a file name
The other half of the same idea, and it needs no /: type [[ or ]( and
what is in your document’s folder is offered under the caret — a path
completion, the way a shell’s Tab completes one, and not a search.
See [x](./          → deep/
                      notes.md
                      writing.md
What you type up to its last / names a folder, walked from the folder your
document is in; what follows is the start of a name in it. So ./ lists the
document’s folder, ../ the one above, docs/ the one below, and docs/no
what in docs/ starts with no, in any case. Folders come first, in bold
and ending in /; a name starting with a dot is offered only once you type the
dot.
The arrows walk the list — eight rows at a time, with where you are in a longer
folder beside the highlighted row — Enter or Tab writes, Escape dismisses
it: the same keys the palette takes, because it is the same gesture. Taking a
folder goes into it — its name and a / are written and the list shows what
is inside — and taking a file finishes the link.
Writing from docs/writing.md:
| You type | It writes |
|---|---|
[[no |
[[notes]] — beside this file. Markdown’s .md is left off a wikilink |
[[deep/bu |
[[deep/buried]] — one folder down |
[the read](../rea |
[the read](../README.md) — one folder up, and a destination keeps the extension |
[n]( then Enter on notes.md |
[n](./notes.md) — ./ is how a destination says beside this file |
[p](./a |
[p](<./a picture.png>) — a name with a space needs the angle brackets, or the link would stop at the space |
A wikilink is left without the ./ when you type none: it is shown as its own
text when you give it no alias, and [[./notes]] would put those two
characters on the page. A bare name is looked for beside the document first, so
it finds the same file.
It finishes the link. The closing ]] or ) goes in with the name, and the
caret ends up after it — unless the closer is already there, which is what the
palette’s own Link to a file row leaves behind, and then the caret steps
over it instead.
Dismissing it means it. Escape leaves what you typed and stays away while
you finish that path: somebody who says not this and keeps typing is writing
a name the folder has not got yet, which is exactly when a list of the names it
has got is in the way. The next link asks again.
Markdown documents only. A document that has never been saved has no folder, and the project’s root is listed instead; with no project either, nothing is.
A link that makes its page
/blink (or /backlink, /new page) writes []() and completes inside
the parentheses like any link, with one row more: when the name you have
typed is not a file yet, Create name.md is offered last. Taking it makes
the file, with the name as its heading, and finishes the link — an ordinary
markdown link, which every renderer follows, its text the page’s name. While existing files match,
they come first, so Enter still takes the one that is there; once nothing
matches, the new page is the only row and Enter makes it.
You type, after /blink |
It does |
|---|---|
Idea, then Enter on Create Idea.md |
makes Idea.md beside this document, writes [Idea](Idea.md) |
docs/Plan |
makes docs/Plan.md — into a folder that is there; none is made on the way |
no, while notes.md is there |
offers notes.md first, Create no.md after it; taking notes.md writes [notes](notes.md) |
big idea |
writes [big idea](<big idea.md>) — a path with a space is put in <>, as markdown asks |
A plain []( never offers to make anything: Enter on a half-typed name should
not leave a file behind that you did not ask for. A file that cannot be made —
a folder you may not write in — leaves the link as you typed it and says why.
Linking to another note
See [[A note]], or [[A note|call it what you like]],
or land on a heading with [[A note#The setup]].
The editor finds the file, so you write the name rather than the path.
Beside this document first, then from the project’s root, then anywhere in the
project by name — and when two files share a name, the one nearest the document
wins. A name with no extension is a markdown file, which is what makes
[[A note]] the ordinary spelling.
Clicking one opens it, in a tab, with the cursor on the heading the link
named. The same is true of an ordinary relative link, [a note](notes/a note.md): a link naming a file in reach of the document is the editor’s, and
everything else — https:, mailto: — still goes to your desktop.
A name nothing answers to keeps its brackets. [[No such note]] is drawn
as the text you typed rather than as a link to nowhere, so a typo is something
you can see.
An embed is the same link with a ! in front of it. A picture is drawn
where it stands, a markdown document is put into the page, and anything
else — a PDF, a file this cannot read — is drawn as a link.
A document is put in only where a page is built: the heavy preview, and
both exports. Your file keeps its ![[…]], and the preview beside the text
draws the link it always has. That is on purpose: the quick preview is redrawn
after every keystroke, and opening files on that path is what would make it
stop being quick.
On the way in, the embedded document’s headings shift down by the level of
the heading the embed sits under — under a ##, its # becomes a ### — all
by the same amount, so the file keeps its own shape. Its front matter is
left out, and a document that would embed itself, directly or by way of
another, draws a line saying so instead of going round for ever.
Your project
Until now the editor held one file. From here it holds a project: a folder, the files in it, and the ones you had open when you last closed it.
Opening a folder
Project > Open a folder… picks one. Everything else follows from it — the explorer, finding a file by name, and what comes back the next time you open it.
You do not have to. Started on a file, the editor takes the folder that file is
in and shows it, so kaivalya-editor src/main.rs gives you src/ in the
explorer without asking. The difference between the two is worth knowing: the
folder you open is the one whose files are remembered. The folder merely
inferred from a file is not, because opening a file that happens to live
somewhere is not a statement about that folder, and a window that started
remembering because of it would replace the record of everything you had open
with the one file you double-clicked.
The explorer
The explorer opens on the left, and lists what is in the project one directory at a time — a folder is read the first time you open it and not before, so a project with a hundred thousand files in it costs nothing to open.
Hidden files are shown, deliberately: .gitignore, .github/ and .env
are files this editor is for, and an editor that hides them by default makes
your first useful act a settings hunt. What .gitignore excludes is not
shown, since target/ and node_modules/ are not what you opened the project
to read. Both are settings — show_hidden and use_gitignore. .git/ itself
is never shown at any setting.
Both can be flipped while you are looking, which is when the question is
usually asked: Project > Show hidden files (Ctrl+Shift+H) and Project >
Show ignored files (Ctrl+Shift+G). A flip costs no read of the disk — the
folder was read whole and only the filter moved — and it carries to the file
picker as well, so the two never disagree about what the project contains. It
lasts as long as the window; the settings file says what a new one starts with.
The project search is the one exception, and the only one: it does not read
what .gitignore excludes whatever these are set to, because a search over a
build directory is noise rather than an answer. It has a toggle of its own —
see which files it looks in.
The explorer follows the disk. A file created by a build, a git checkout, or
another editor appears without your asking; one deleted goes away.
Ctrl+Shift+E shows and hides the pane.
Filtering it by name
The box at the top of the explorer filters it. Type part of a name and the pane shows the files that match with only the folders on the way to them, opened — a folder with nothing matching under it is not a folder you asked about.
It finds files the tree has never read. The explorer opens a folder only
when you do, so filtering what is on screen would only ever find what you had
already opened; this searches the whole project, the same list Ctrl+P
searches, and matches the same way — sm reaches src/main.rs.
Clicking a folder in a filtered pane takes you there: the box empties and that folder opens in the tree. Emptying the box yourself puts the tree back exactly as it was, folds and all.
Favourites and recent
Four lists, and they live in the menus:
| File > Favourite files | Files you marked, with File > Keep this file in favourites. They stay until you unmark them. |
| File > Recent files | The last dozen files you opened. |
| Project > Favourite folders | Folders you marked, with Project > Keep this folder in favourites. |
| Project > Recent folders | The last dozen folders you opened. |
Each row is the whole path, so two files called README.md are two rows you can
tell apart. Clicking a file opens it; clicking a folder opens that project,
and brings back what you had open in it. An empty list is not a submenu at all.
They are in the menus rather than in a pane because a menu is what a list you consult twice a day is worth: a column of the window is worth more than that, and it goes to your text instead.
Project is the first menu, because the first thing you do in a session is choose what you are working on and only then which file of it. Where one menu holds a whole subject, that subject is a submenu of it — Edit, Table and View under File, and these four lists under File and Project.
Tabs and the open files
Every open file has a tab, the first one included — the tab is what names the file you are reading. Opening a second file puts it in a tab beside the first.
| Next, previous document | Ctrl+Tab, Ctrl+Shift+Tab |
| Close this document | Ctrl+W |
| Close all of them | Ctrl+Shift+W |
| Close all but this one | Ctrl+Alt+W |
A right-click in the text also copies the file’s whole path or its name, as the explorer’s row menu does.
The four commands that close several are in Project > Close several, and all of them are on a right-click in the text — which is where a hand already is when it wants one. The menu offers only what there is to close: with one file open it says close this file and nothing about the others.
Nothing with unsaved changes is ever closed without asking — not by closing a tab, not by closing the window.
A file another program writes is shown as it now is, in its tab, within a
second — a git pull, a formatter, another editor. The caret stays on its
line; undo starts over from the new text. A tab with unsaved changes keeps
them: the status bar says the file changed underneath, and saving writes your
version over theirs. This works for the files inside the open project, which is
the folder the editor watches.
The open files are a pane as well, on the left beside the explorer: one row per document, named as its tab is, the whole path under it, the active one marked and a dot on one with changes not yet saved. A click goes to it and the cross closes it. Unlike the tab bar it does not run out of room, and it is there with one document too.
The button that lists them sits at the right-hand end of the tab bar, and
open_files_button can put it at the left, at both ends, or nowhere:
show_files = true               # the pane; false takes it away
files_side = "left"             # or "right"
open_files_button = "right"     # "left", "right", "both" or "none"
The question takes the keyboard. Return presses the first button, which
is the one that keeps your work — Save here, Reset in the settings, Replace in
the search. Escape is Cancel. The arrows and Tab reach the buttons between,
and the row does not wrap round: walking off the end of Save must not land on
Discard.
Finding a file by name
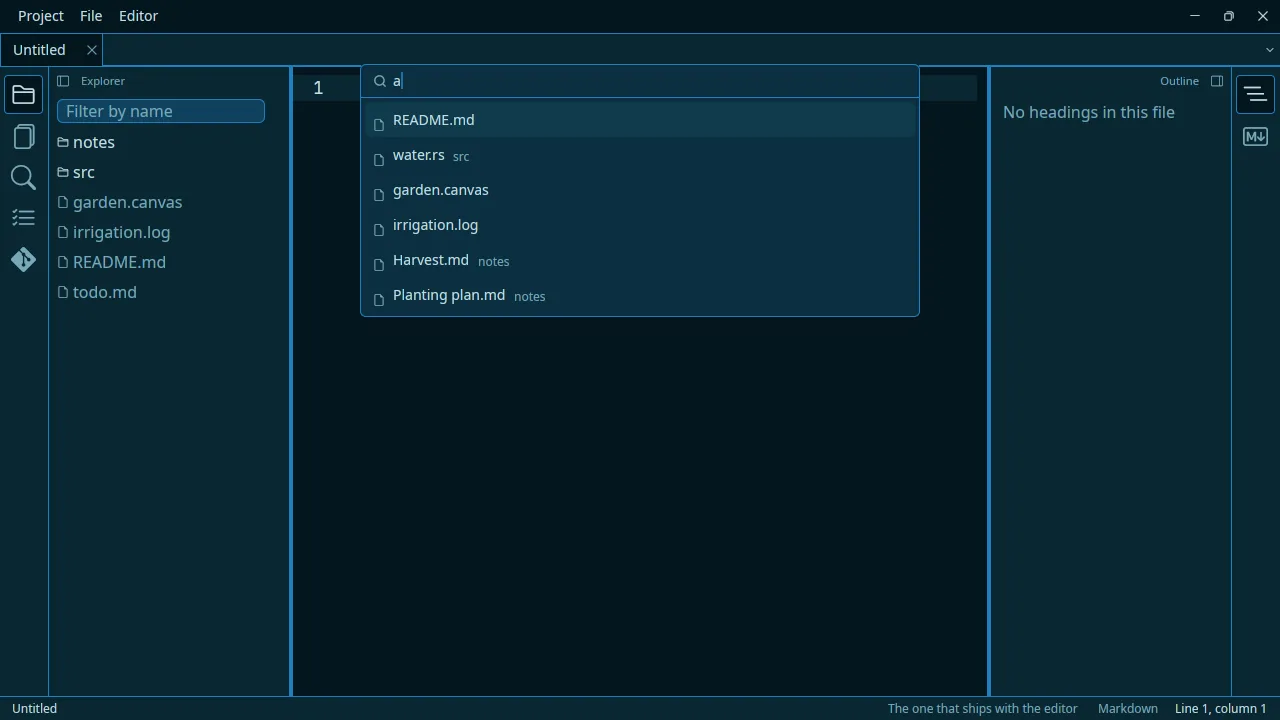
Ctrl+P, then type any part of the name. You do not have to type it in order:
sm finds src/main.rs, and a capital letter means you meant it, so readme
finds README.md while README looks for that spelling.
Arrow keys move and Enter opens. Escape clears what you have typed, and a
second Escape closes; Ctrl+P again closes it in one press whatever is in it.
The project is read the first time you ask — not when the folder opens — and
kept up to date from there, so the first Ctrl+P in a large project takes a
moment and the rest are instant. A project too large to list entirely says so
rather than quietly failing to find things.
Searching and replacing in the project
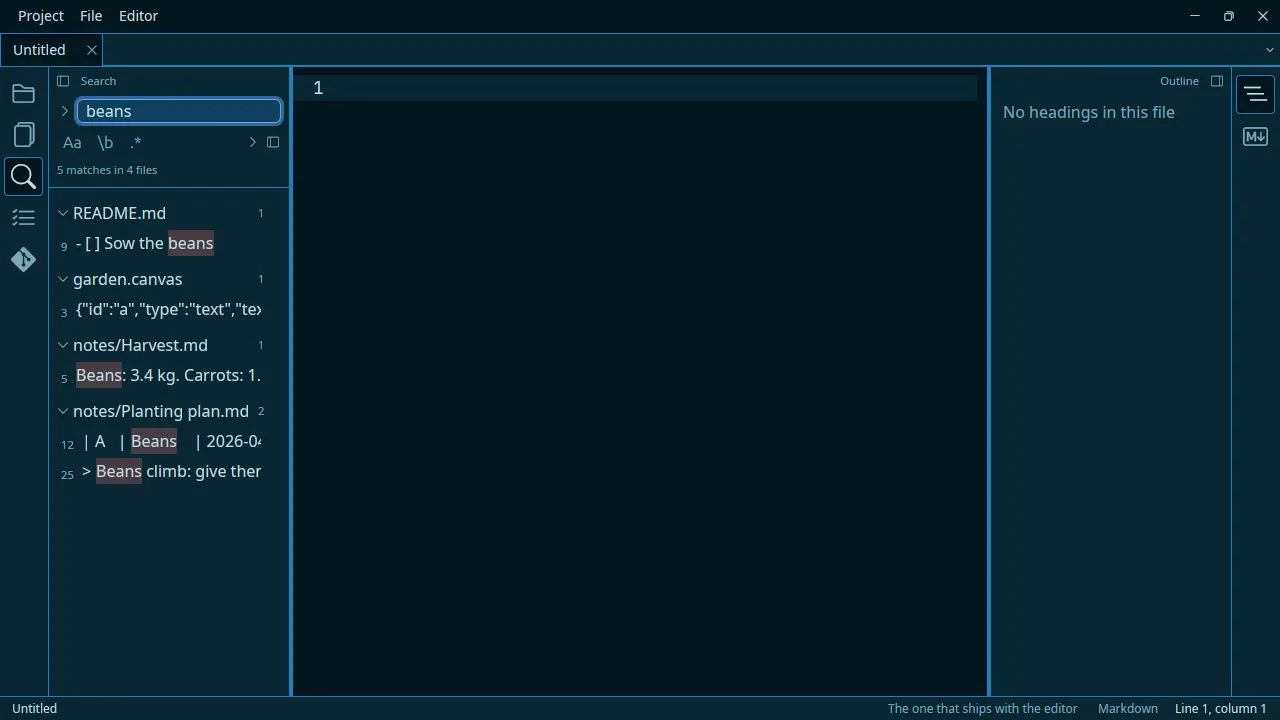
Ctrl+Shift+F opens the search and puts the cursor in its box. Type, and the
results arrive a moment after you stop.
A result is a line. The file’s path is a heading and the lines under it are what you click; each row carries its line number and the line itself with the matching part picked out. The heading carries how many matches that file has, and clicking it folds them away — one noisy file out of the way without changing the query. The button at the end of the toggles folds every file, and folds them back open when they are all shut.
A fold belongs to the file, not to the list: narrow the query and a file you had folded comes back folded, which is the whole reason to fold one. Clicking one opens that file with the cursor on the match — not at the start of the line, so you do not have to find it twice. If you were reading a rendered document, the text comes back beside it: a preview has no lines to land on.
Three toggles sit under the box:
Aa |
Match case. Off is not “ignore case” — it is smart case: the search ignores case until you type a capital, and then it means it. |
\b |
Whole word. cat stops finding catalogue. |
.* |
Regular expression. Off, the pattern is literal, so searching for a.b finds a.b and not axb. |
A pattern that is not a valid regular expression says so, in the words of the engine, rather than quietly finding nothing.
Which files it looks in
The chevron at the end of the toggles opens three more controls, and they answer “where” rather than “what”:
| Files to include | Only these are searched. *.rs, docs, **/api/** — comma-separated. |
| Files to exclude | These are not, whatever include said. |
| ignored | Search the files .gitignore excludes. Off. |
The globs are the ones you already write in a .gitignore: *.md matches at
any depth, docs/** from the project root, and a bare name means the folder
and everything in it — docs and vendor do what you expect rather than
matching one directory and none of its files. A glob that will not compile says
so, in the words of the matcher, like a pattern that will not.
They prune the walk rather than filter the results, so excluding target makes
a search faster rather than merely shorter. Nothing here is remembered: close
the editor and the boxes are empty again, like the query itself.
By default the search does not read what .gitignore excludes — even when the
explorer is showing it. That is a deliberate difference between the two, and
the only one: the explorer answers “what is in this folder”, and a search over a
build directory is tens of thousands of files you will never edit and matches
you cannot act on. The ignored toggle is how you say otherwise for one
search, and a search that comes back empty says that it did not read them, so a
file you can see and cannot find is never a mystery.
Otherwise the search looks where the explorer looks — hidden files yes, .git/
never. Files that are not text are skipped, and so is any file larger than 16 MB;
if one was, the status line says how many.
Very large results are cut rather than held: at a thousand files, or a hundred matches in one file, or four hundred characters of one line, it says it is showing part of what it found.
Replacing
The chevron beside the box opens a replace row: the same query, one line further down, and Replace all beside it.
What is on the list is what changes. The results are the preview — every file and every line — and the replace is given exactly those and opens nothing else, so a file created since you searched is not touched. It asks first, with the count, and the list stays visible behind the question.
Three things it will not do:
- It will not write to a file with unsaved changes. Those are left alone and counted in what it says afterwards; save them first if you want them included.
- It will not use stale positions. Every file is matched again as it is written, so a file you edited between searching and replacing is either replaced correctly or skipped and reported — never corrupted.
- It will not leave a file half written. The new text is written beside the old and renamed over it, keeping the original’s permissions.
Files you had open are re-read, so nothing on screen is left showing text its file no longer holds, and the search runs again — every line of the old list had just stopped being true.
With a regular expression, the replacement can use its groups: $1 is the first.
With a literal search the replacement is literal too, so $1 is two characters.
The outline
Ctrl+Shift+O (File › View › Outline) shows the headings of a
markdown file, or the definitions of a code file (functions, types,
impls…), nested. Click one to go there. Settings: show_outline,
outline_side.
The outline of a file that is code
The outline pane lists a code file’s definitions, nested as they are
written: a struct, the impl under it and the functions in that — in Rust,
Python, JavaScript, TypeScript, Go, Java, PHP and shell, the rules of a
stylesheet, and the tables of a TOML file. Each row says what the source says,
pub fn outline or class Reader, and a click goes to its line, as a heading
does in markdown. F6 walks it the same way.
The scrollbar carries the same places: a mark for each top-level heading
or definition and, in red, each TODO line of the file, so you can see where
they are without opening a pane. They are drawn from what the outline and the
TODO pane have already read, never from a second rendering of the file; the
scrollbar under them still takes your clicks. scrollbar_marks = false takes
them away.
The table of contents
File › Generate or update the table of contents writes a list of links
to the document’s headings at the caret, between two markers; run it again
anywhere and the list is replaced where it is. Setting:
toc_max_level — the deepest heading included.
Backlinks
The markdown pane’s Backlinks section lists every other markdown file of
the project that links to this one — by wikilink, embed, ordinary link or
picture, with or without .md, from the file’s folder or from the project’s
root (/docs/notes.md), or as an HTML <a href> — resolved the way a click
resolves it — with the line each link is on. A path only written in the
text, in backticks or not, is not a link and is not counted. A click
opens that file on that line. It looks when you open the section, and again
when you change document or save one; it writes nothing. Files your .gitignore leaves
out are not looked in.
To keep the list in the file, use Generate or update the backlinks (in the same section, or the command list). It writes a block at the caret the first time and replaces it wherever it is after that, as the table of contents does:
<!-- mentions -->

**Backlinks**

- [index](../index.md): `See [[Notes]] for more.`
<!-- /mentions -->
Each sentence is quoted in a code span, so a link inside it is not counted as a mention of something else the next time. Nothing updates the block on its own: it changes when you ask, which keeps the file yours.
The TODO pane and the task board
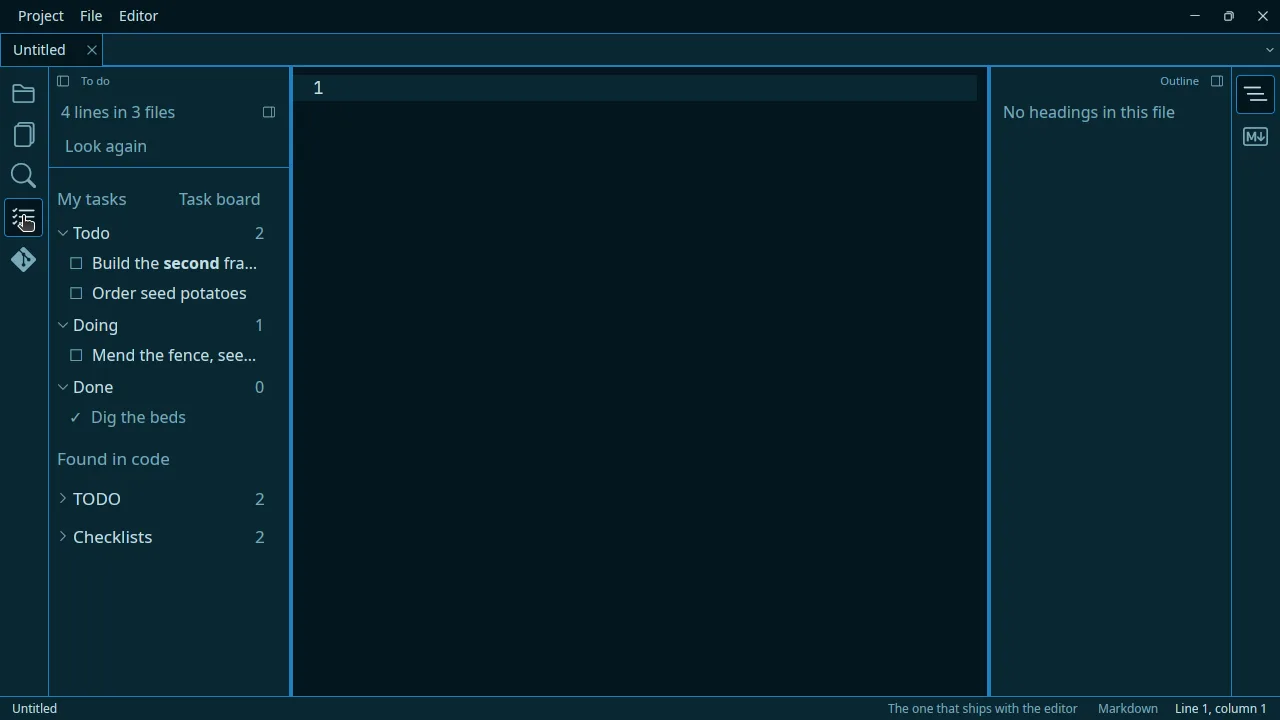
The TODO pane lists every line of the project that carries a tag — TODO
and FIXME unless you say otherwise — in any kind of file: a // TODO in
Rust, a - FIXME in markdown, a /* TODO */ in a stylesheet. Grouped by file,
the line’s number on the left, and a click goes to the line.
show_todo = true
todo_side = "left"               # or "right"
todo_tags = ["TODO", "FIXME"]    # add "XXX", "HACK", "NOTE"… as you like
My tasks come first: the project’s own todo.md, at its root, read the
way kanban extensions read it — each ## heading is a column, each list item
under it a card, - [ ] open and - [x] done:
## Todo
- [ ] write the release notes

## In progress
- [ ] the board

## Done
- [x] the TODO pane
Each column is a heading in the pane, open until you fold it, with its open
cards counted; a card’s box ticks it in todo.md, and a click goes to its
line. A project without one shows Start a todo.md for this project, which
writes those three columns and opens it. todo.md is then left out of what is
found in code below, so nothing is listed twice.
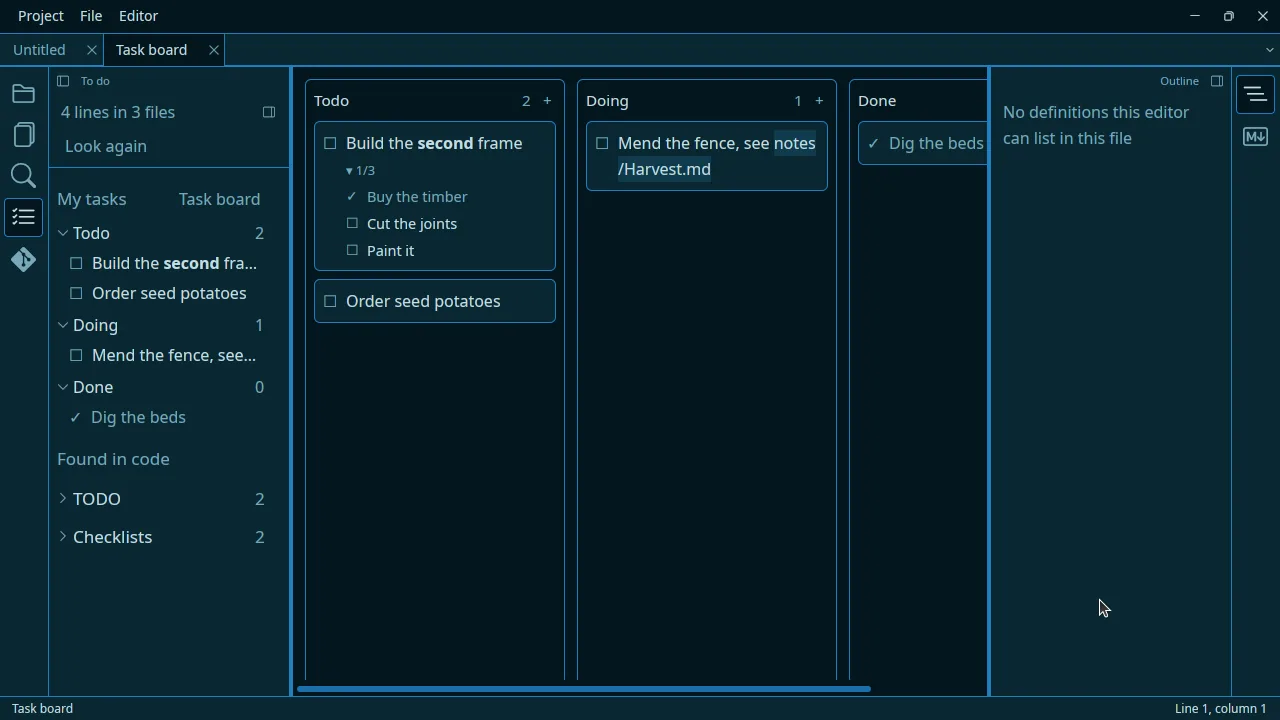
The task board — Task board beside My tasks, or Project › The task
board — shows todo.md as columns of cards in a tab. Drag a card to
another column and its line moves there in the file, with the lines indented
under it; the box ticks it, a click opens it at its line. Moving a card to
Done does not tick it, as in the extensions it follows: the box is the
tick. A move, or a card added with a column’s +, is saved at once — in
todo.md’s tab when it is open, as one undo step there. The file stays the
truth — edit it by hand and the board follows.
A card’s text is markdown — **bold**, `code`, a link — drawn as
the preview draws it, on the board and in My tasks. The tasks indented under a card are its subtasks,
one level, as on GitHub:
## In progress
- [ ] the release
  - [x] the notes
  - [ ] the tag
The card shows how many are done, ▸ 1/2, folded; a click on the count
unfolds them as a checklist on the card, and again folds them. There a box
ticks a subtask in todo.md — the card itself is ticked only by its own box —
and a click goes to its line. Dragged, a card takes its subtasks with it. A
subtask indented deeper still is read as one of the same list; a blank line
ends it.
→ moves a tagged line to My tasks: it becomes a card at the end of the
first column, - [ ] tidy (src/main.rs:12), and leaves its file — the
comment, and the line when it is nothing else. A line with code before its
comment keeps the code: let x = 1; // TODO: tidy becomes let x = 1;. Each
file is changed in its tab when it is open, so it can be undone there, and a
line that has changed since the pane looked is not moved.
A tag is a whole word, as written: TODO finds TODO: and TODO(ana),
and not todo in a sentence, TODOS or MASTODON. A line with two tags is
one row.
The lines are grouped by keyword, then by file: a head per keyword with its
count — TODO 12, FIXME 3, in the order todo_tags gives them — then, under
an open keyword, a head per file with its own count, then the lines. The
keywords start shut, so the pane opens as a short summary; click one to open
it. A line with two keywords, TODO and FIXME, is listed once, under the first
of them on the line. A file’s heading folds its lines away under that
keyword only, and the button beside an open keyword’s count folds all its
files at once, or opens them all again. The button beside Look again opens everything, or — when
everything is open — shuts every keyword. The count at the top is always of
every line, open or not, and what you left open comes back with the project.
Unticked checklist items are there too, under Checklists after the
keywords: every - [ ] (or * [ ], + [ ], 1. [ ]) at the start of a line
in a markdown file. A ticked [x] is done and not listed; a [ ] in the middle
of a sentence, or in a code file, is not an item. They come with the keywords —
with todo_tags empty, the pane looks for nothing. Tick one from the pane
with the box at the start of its row: it is written in its file — in its tab,
undoable, when the file is open — and leaves the list. A line that has changed
since the pane looked is not ticked, and the status bar says so. The rest of
the row still takes you to the line.
It is the project search’s own walk, so it looks where the explorer looks — a
.gitignored target/ is left out unless it is shown — and it walks only
while the pane is on screen: when you open it, and again after any file in the
project is written. Look again in its head is for a change the editor could
not see.
Today’s note and templates
Today’s note
File › New › Today’s note, or Ctrl+Shift+J, writes YYYY-MM-DD.md into the folder
daily_note_folder names — journal unless you change it — and opens it. If
daily_note_template names one of your templates — rpg/journal for one in a
folder — the note starts from it,
with {{title}} being the note’s own date. journal.md ships for it, in
the templates folder beside your settings, and is the one named by default: the
day as a heading, then Notes, To do and Done, the cursor under Notes.
Change it there — it is yours, and never written over.
It never overwrites. Asked for again the same day it opens the note you already have, which is what makes it safe to reach for out of habit.
Templates of your own
A file in .kaivalya/templates/ in your project, or in templates/
beside your settings, is a row in the palette. Both folders are read when the
palette opens, so a template you wrote five minutes ago is already there.
.kaivalya/templates/
  meeting.md        → /meeting
  weekly report.md  → /weekly, /report
The file’s name without .md is what the row is called and what you type at —
a template is your own word, so it is not translated. The group appears only
when there is something in it, and each row says whether it came from this
project or from your own folder. On the same name, the project’s wins: a
project that brings its own meeting means its own.
Folders are groups. Keep templates in folders, as deep as you file them, and the palette opens each folder as it opens a group of its own rows:
templates/
  rpg/
    shadowrun/pc.md   → Templates › rpg › shadowrun › pc
    l5r/pc.md         → Templates › rpg › l5r › pc
Escape, or the row at the top, goes back up one folder. Typing still
searches every template at once, wherever it is filed: /pc offers both,
each with its folder on the right, and a folder’s name reaches what is in it —
/shadow offers the Shadowrun ones. A folder whose name starts with a dot is
not read, and the walk stops eight folders down.
Four things are filled in as it is written:
{{date}} |
Today, as 2026-09-23 |
{{time}} |
Now, as 14:32 |
{{title}} |
The document’s own file name, without its extension |
{{cursor}} |
Where the cursor is left. Without one it lands at the end |
Everything else is left exactly as you wrote it — {{ .Site.Title }}, a
{{typo}}, a {{ that never closes. Your template may be about templates, and
an editor that ate what it did not recognise would be no use for writing one.
A template can be one line, and two ship that way. The first start puts
name.md and mail.md in templates/ beside your settings, holding
Toto Titi and titi@toto.corp: write your own name and address over them,
and /name and /mail write those in every project you open. That is the
whole of what an “insert my name” feature would have been, and it is yours to
change without asking anybody.
They are written once and never again. A stylesheet the editor ships is
overwritten at every start, because it is the editor’s; these exist to be
edited, so one that is already there is left alone. Delete one and it comes back
at the next start — empty it instead if you want it quiet. The originals are in
resources/templates/ in the source.
- Settings:
daily_note_folder("journal"),daily_note_template("journal").
A project’s own settings
Project › This project’s settings opens the project’s own settings.toml, in its
.kaivalya/ folder, and makes it if it is not there. Write in it only what
this project changes, with the same names and values as in your own settings
file — which explains every one:
# .kaivalya/settings.toml
todo_tags = ["TODO", "FIXME", "NOTE"]
tab_size = 2
soft_wrap = false
Every option is looked for there first, then in your settings, then in the editor’s defaults, so an option added in a later version never needs this file refreshed. It applies when the project opens and when the file is saved, and your own settings come back when you open another project. A name this editor does not know is said in the status bar, and the rest still applies; a file that does not parse is said and leaves your settings as they are. A tab width applies to the documents you open after it; the theme and the fonts change for the whole application.
Project › Write the project file (.kaivalya/project.toml) writes the project’s rule file — its stylesheet, autocommit and the like — with every key explained and commented out, so it does nothing until you uncomment a line.
Reaching a pane without the mouse
F6 puts the keyboard in the pane beside your text, and pressing it again moves
on to the next one and then back to the text. Shift+F6 goes round the other
way. Escape gives the keyboard back to the text from wherever it is.
It stops at the pane an edge is showing and never at an icon in a rail: somewhere with no highlight to put is not somewhere a keyboard should be.
Once the keyboard is in a pane:
↑ ↓ |
Up and down the list, wrapping round at both ends |
Home End |
The first row, and the last |
→ ← |
In the explorer, open a folder and fold it shut again |
Enter |
Open what is marked — and the keyboard goes with you, into the text. In the open files, go to that document |
It starts where you are, which is what makes it worth reaching for: the outline opens on the heading your cursor is under rather than on the first one, and the explorer and the open files on the file you have open. The search is the exception and needs no rule — its box is a text field, so the keyboard simply goes into it.
What comes back
Open a folder you have worked in before and the editor puts back the files you had open, which one was in front, and where the cursor was in each — and the markdown pane’s sections you had open, and the TODO pane’s keywords you had open and files you had folded. The markdown pane opens with every section shut in a folder opened for the first time, and for a file opened on its own: its headings are a table of contents, and you open the one you came for.
A file that has been deleted since is dropped without a word: a project being worked on between two runs of the editor is ordinary, not an error.
None of this is written into your project. It lives in the editor’s own data
directory, so nothing appears in git status and there is nothing to add to
.gitignore.
Several windows
Editor › New window, or Ctrl+Shift+N, opens another window on the home
screen, whatever on_open says — the project it would carry on with is
already open in the first. Each window has its own project, its own tabs and
its own panes. A project open in one window is not opened in a second:
asking for it brings the window that has it to the front, because two windows
on one project would each write down what was open in it, over the other.
Quit goes through every window: each asks about what is unsaved in it, as closing it would, and the editor stops once the last has agreed. Cancel any of them and the windows still open stay open.
Git
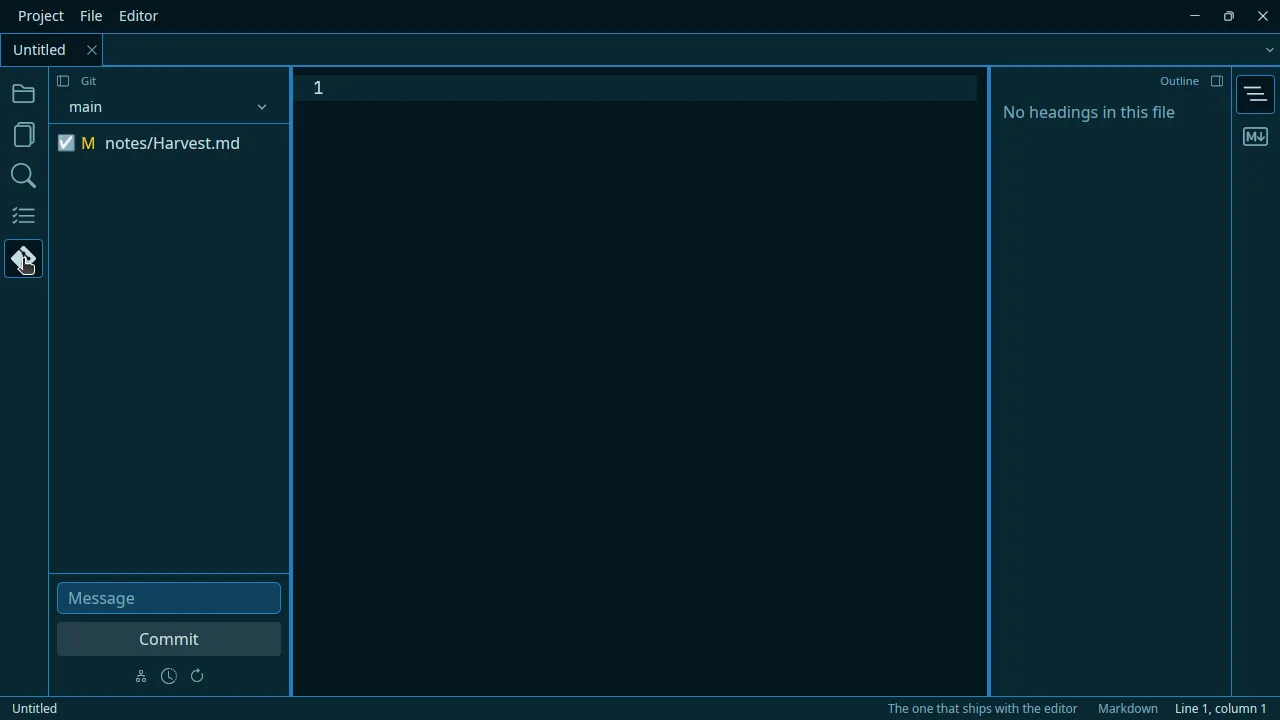
A project that is a git repository has a Git pane on the left, behind the
branch icon in the rail. It is read with gitoxide, inside the editor: apart
from fetching, pushing, rebasing and switching or creating a branch, nothing
runs git, so all of it but those works the same whether git is installed or
not, and whatever your git is configured to page or colour.
What changed
The head of the pane says which branch you are on. Under it, every file that
differs from the last commit, the way git status --short lists them:
| A | added — a new file, whether git knows about it yet or not |
| M | modified |
| D | deleted |
| R | renamed |
| T | its type changed — a file that became a link |
| U | in conflict after a merge |
A file already staged with git add says staged beside its name. Ignored
files are not listed. The pane reads the repository again whenever a file in
the project is written — your saves included — and Look again reads it on
demand, for a change made by something the editor did not see.
Under Commit, a row of small buttons, each named when the pointer rests on it, and only those that can be done are drawn:
| cloud, arrow down | Fetch — with a remote |
| cloud, arrow up | Push — with a remote, on a branch |
| arrow bending up | Rebase — when the branch follows one |
| one line into two | Graph |
| clock | History |
| circular arrow | Look again — there even when the folder is not a repository, for a git init made in a terminal |
A button whose command is running is drawn in the accent colour, and its name says so — Fetching… — until it is done.
The difference in one file
Double-click a file — or reach it with F6 and press Enter — and its
changes since the last commit open in a tab beside your files: the old text
on the left and the new on the right, a replacement set against what it
replaced, three unchanged lines around each change, and each line’s number.
Unified, in the tab’s head, turns it into one column as git diff prints
it. Asking again for the same file brings the same tab forward; Ctrl+W
closes it.
Committing
Each file has a tick, and they start ticked. Untick what should not go in,
write a message, press Commit. It is git add of the ticked files followed by
git commit -m with your message:
- anything you had already staged goes into the commit too, as it would on the command line;
- a deleted file that is ticked is deleted in the commit;
- the author is the one your git configuration names,
user.nameanduser.email— if neither is set, the commit is refused and the status bar says so; - an empty message is refused, and so is a commit that would change nothing.
The status bar says the new commit’s short id. A file with changes you have not
saved is committed as it is on disk, which is what git add would take;
save first if you mean the version on screen.
The message is one line — a subject — and Enter in it commits. A commit
that wants a body is still one git commit away.
Branches
The branch name at the head of the pane is a menu: every local branch, the one you are on ticked, and New branch… under them.
- Choosing a branch switches to it: it runs
git switch. The files that differ between the two are written from the branch; your uncommitted changes in other files come with you. If one of your changes is in a file the switch would overwrite — or an untracked file sits where the branch has one — nothing is written, and the status bar names the files: commit them or undo them first. The editor also asks you to save or close any document with unsaved changes before it switches, because what is in a buffer is a version of a file the switch cannot see. Open documents the switch rewrote are read again; one whose file the branch does not have is closed. Both write the linegit reflogshows, as they would from a terminal. - New branch… opens a field under the head: type the name and
Enter. It isgit switch -c— a branch where you are, and you on it — so nothing on disk changes and your uncommitted work stays exactly as it was. A name git would refuse is refused here, and the field keeps what you typed.
History
History opens the branch’s commits in a tab, newest first, the last five hundred. Click a commit and the right half shows it in full: its whole id, the author and their address, the exact moment in the author’s own time zone, who committed it when that is somebody or some time else, its parents — two for a merge — its whole message, and the files it changed. Double-click one of those files and what that commit did to it opens in a tab of its own, against the commit’s parent.
Committing on its own
A project can commit the files you save by itself — for a folder of notes
whose history you want kept without thinking about it. It is turned on in the
project’s own file, .kaivalya/project.toml (the project’s
rules), which is about the whole
project: a commit takes files from anywhere in it.
autocommit = 60           # seconds of quiet after a save; absent or 0: off
autocommit_push = false   # only to keep the commits here; absent or true: push
After a save, the editor waits that many seconds with no other save, then
commits the files you saved in the meantime, with their names as the message —
notes.md, todo.md. Each save starts the wait over. A file that did not
actually change is left out, and so is one git ignores; nothing is committed
while a merge or a rebase is in progress, and a file in conflict never is.
Anything you had already staged goes in too, as with Commit. It then
pushes, through your git, like Push — unless the file says
autocommit_push = false; a push that fails is said in the status bar, and the
commit stays, for the next push to take.
Leaving the project does not wait for the quiet. Close the window, quit the editor or open another project, and what you saved since the last commit is committed and pushed there and then, without a question. Closing waits for that push — a moment on a slow network — since a window gone would drop it half way; a push that fails there is written to the terminal, and the commit stays. Unsaved files are still asked about first, as always, and what you save in answer goes in the same commit.
The editor asks you first, once per project. .kaivalya/ travels with
the repository, so a clone of somebody’s notes would otherwise start
committing and pushing your saves without you ever saying yes. Your answer is
kept on this machine, with the project’s session — never in the repository —
and it is an answer to that rule: if the rule changes, a shorter wait or a
push where there was none, you are asked again. That is also how a Not in
this project is taken back: change the rule.
The branch graph
Graph opens every branch in one tab — your local
branches, the remote ones fetched, and the tags — newest first, the last five
hundred commits, drawn as git log --graph --all draws them: a coloured lane
per line of descent, a dot per commit, and the names of the branches and tags
that point at it, HEAD first. Click a commit and it shows in full on the
right, as in the history.
Fetching and pushing
When the repository has a remote, the pane has Fetch and Push, and when the branch follows one, under its name, where it goes and how far apart the two are: origin/main ↑2 ↓0 — two commits a push would send, none a pull would bring — and Rebase.
- Fetch is
git fetch --all --prune. - Push is
git push. A branch that follows nothing yet is pushed to the only remote there is, or toorigin, and set to follow it —git push -u. With several remotes and none of themorigin, it asks you to choose on the command line. - Rebase is
git rebase: your commits the remote does not have, replayed on top of what it does — fetch first, so that is up to date. If a commit conflicts, the rebase is undone at once and the status bar says so: your branch and your files are as they were, and a rebase with conflicts to resolve is one for a terminal. It does not start while a document has unsaved changes, nor while a merge or another git operation is in progress; the documents it rewrote are read again.
These three run your installed git, so your ssh keys, credential helpers
and proxies work as they do in a terminal. It never waits for a password: a
remote that wants one nobody stored — or an ssh key behind a passphrase no agent
holds — fails at once, and the status bar says what git said. So does every
other failure. While one runs its button says so, and a second press does
nothing.
Blame
File > Blame this file opens a tab with every line of the file and, for each
run of lines, the commit that last changed them, its author and its day —
git blame. It describes the last commit’s version of the file: lines you
have typed since have no commit yet.
A merge that stopped on conflicts
When git merge stops, the pane says Merging and marks the files in
conflict with U. Double-click one and it opens in a merge tab: each
conflict with our side on the left and theirs on the right — and the
common ancestor under them when git wrote one — and three buttons, Take
ours, Take theirs and Take both. A choice rewrites that block in the
file at once, and any tab holding the file shows it. (The file is the truth:
fix a block by hand in the editor and it is simply gone from the merge tab.)
When none is left, Mark as resolved does what git add does to a conflicted
file.
Then commit from the pane. An empty message means the one git prepared — Merge branch ‘feature’ — and the commit is the merge: both branches are its parents, and the merge is over.
What is not here yet
Starting a merge, pulling, and a rebase that stops for you to resolve its conflicts.
show_git = true      # false takes the pane away
git_side = "left"    # or "right"
Reading and sharing
The preview
Ctrl+Shift+V(File › View › Preview instead of the text): the document drawn, in place of its text. The same key brings the text back.Ctrl+Shift+B(File › View › Preview beside the text): both, side by side. The preview follows the caret from heading to heading; scrolling either side brings the other to the same heading, and clicking a heading in the preview takes the text there.
The live preview repaints at every keystroke and is drawn in the editor’s own theme, not your stylesheet; maths, alerts’ icons and diagrams are shown as written. For those, use the heavy preview.
- Settings:
markdown_mode("edit","preview","split") — the view a markdown file opens in;preview_follows_caret.
See Previews and exports: which draws what.
The heavy preview
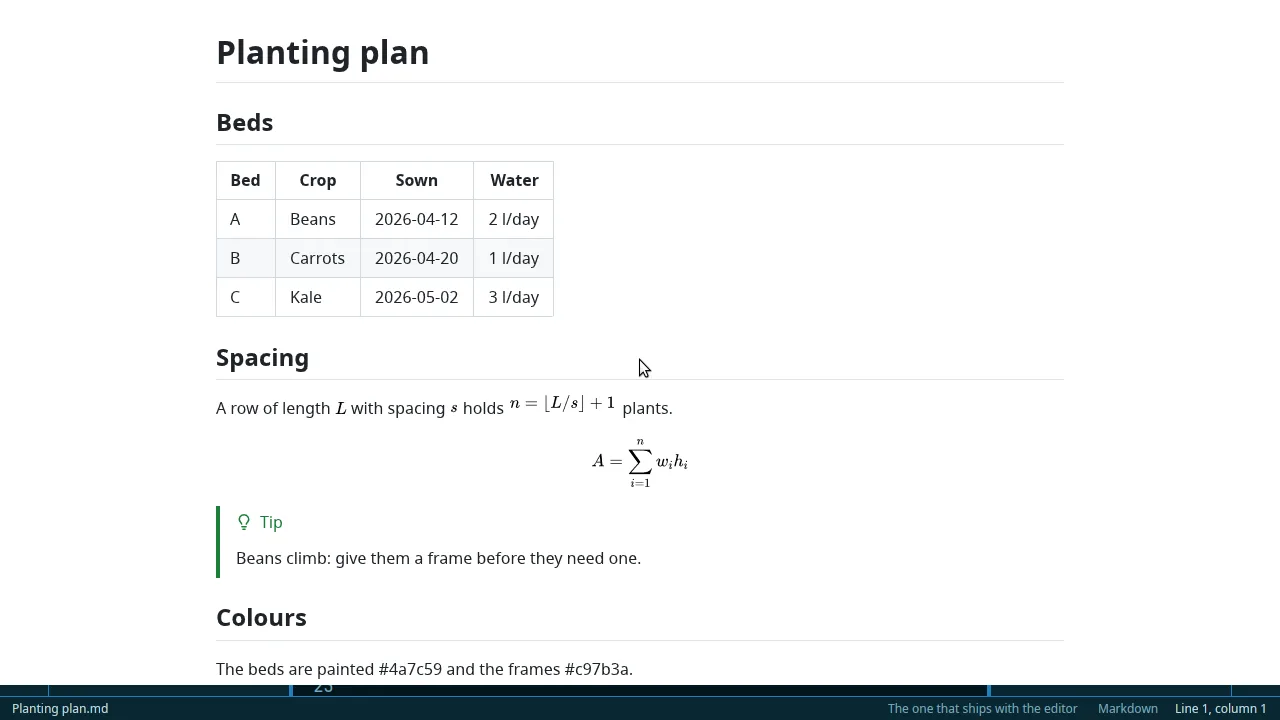
The editor has two previews, and they are for two different moments.
The live preview — beside the text, or in place of it — is drawn by the editor itself, in the editor’s own theme. It follows every keystroke and it is what you write against.
The heavy preview is a window of its own that draws the document the way a browser would: your stylesheet, exactly as you wrote it, with real tables, real type and real mermaid diagrams. It is what you open when the question is what will this look like to somebody else.
Turning it on
It is offered by default, and that is all the setting does: the renderer
costs nothing until a preview is actually opened, so what heavy_preview asks
is whether the command and its button are there at all. Set it to false and
they go away.
In your settings file — Editor > Settings file, or Ctrl+,:
heavy_preview = true # the default. false takes the command away
The build is the other half. The renderer is a second program,
kve-preview, built alongside the editor by make build and installed beside
it by make install. A build made without it says so when you ask for a preview
rather than failing quietly.
Both switches exist for one reason — the memory an open preview holds — and it is stated below rather than hidden.
Opening it
Ctrl+Shift+P, or Open in the heavy preview in the markdown pane’s View section. The same
command closes it again, and so do Escape in the window and the window’s own
close button.
It follows what you type, at the same pace as the live preview, and it keeps your place on the page while it does — a preview that jumped back to the top on every keystroke would be no use for the thing a preview is for.
It shows whichever document is in front. Change tab and the preview changes with you, so the two can never come to disagree about what you are looking at.
Moving around it
The wheel and the trackpad scroll it, and so does the keyboard:
↑ ↓ |
A line at a time |
Page Up Page Down |
A screen, keeping two lines of the one you were on |
Space / Shift+Space |
The same, for a hand that is not on the arrows |
Home End |
The top, and the bottom |
Escape |
Shut the window |
Escape shuts it and nothing else does: a modifier on that key belongs to the
renderer’s own shortcuts or to your desktop, so Ctrl+Escape — which some
window managers use — leaves this window where it is.
There is no scrollbar, and that one is not ours: the renderer draws the page-level bar’s thumb and then never marks it visible. It is reported, the report is written out, and this window works without it in the meantime — which is what the keys above are for.
What it draws
-
Your stylesheet, as written. Whichever one the document resolved to — a folder rule, a
css:line in the document, or the one you picked in the footer. It is served exactly as you wrote it and is never repainted to match the editor’s theme. The stylesheet the editor ships is the one exception: it carries a light and a dark palette and follows your theme, because it is ours to make follow. -
Images beside the document.
resolves against the document’s own folder, the way it does everywhere else. -
Diagrams. A fenced block marked
mermaidis drawn as a diagram:```mermaid flowchart TD A[Editor] --> B[Preview] ```Drawn in Rust, in the editor, with nothing to install — no Node, no browser, no JavaScript engine. A diagram that will not parse is shown as the text you typed with the renderer’s complaint under it, so you can see which arrow was wrong.
-
HTML files too. Open a
.htmlfile and press the same keys: it is shown as the page it is, rather than parsed as markdown. -
Flags in colour. 🇫🇷 is two letters that only a colour emoji font joins into a flag. GNU FreeFont, installed on many Linux systems, draws them as two boxed letters, and it would be found first. So the preview runs without FreeFont, and only the preview: other programs still see it. As a result, a stylesheet that asks for
FreeSans,FreeSeriforFreeMonogets the next font in its list here. -
❤️ in colour too. ❤️ is ❤ followed by an invisible as an emoji, please. A font that has its own ❤ — the page’s text font, often — draws it grey and never reads the request. So every character written that way is given the colour emoji fonts first, here and in an exported page. A ❤ written without the request stays as the text font draws it.
What it will not do
It cannot reach the network. A document that links to a picture on the internet shows the alt text instead. That is deliberate and it is built rather than promised: the part of the renderer that would make the request is not in the program. A preview that quietly fetched whatever a document pointed at would be a preview that tells somebody else what you are reading.
It does not scroll with the text. Not yet — see the roadmap; it is the next thing this window makes possible rather than something it already does.
What it costs, and when
This is the one feature in the editor with a memory cost worth stating plainly, which is why it is behind two switches rather than none.
| The editor, with no preview open | about 117 MB |
| The preview’s own window | about 117 MB more |
| The editor, for having one | about 5 MB |
The preview is a separate program, and that is what makes those numbers honest: an editor that never opens one holds no part of it. Close the preview and the whole of it goes back to the machine; close the editor and the preview goes with it.
Measured on the slowest machine the editor is expected to meet — a 2017 laptop with integrated graphics, drawing in software.
Choosing a stylesheet
The name at the right of the footer is the stylesheet the document is drawn with in the heavy preview and the export. Click it to choose another, in the order the editor asks:
- The one you pick in that list, for this document, on this machine.
- The document’s own, in its front matter:
css: ./house.css. - A rule for a whole folder, in
.kaivalya/project.toml. - The one that ships, GitHub’s.
Your own stylesheets go in ~/.config/kaivalya-editor/styles/. See
Choosing a stylesheet and
Add a stylesheet.
Exporting as HTML
File › Export as HTML… writes the document as one .html file, the
page the heavy preview shows. It asks three things, with the sensible answer
already chosen:
- Pictures inside the page (one file that works anywhere) or beside it.
- Maths and diagrams drawn here, or left for the reader’s browser to draw with MathJax and mermaid.js — better maths, but the page then reaches the network when it is opened.
- A back button on each footnote, and the stylesheet.
Project › Export the project as HTML… does every markdown file of the project into a folder, at the same paths; links between pages keep working, and what git ignores is not exported. For a PDF, print the page from a browser.
- Settings:
export_mathjax_url,export_mermaid_url— where the browser fetches them from.
See Exporting as HTML.
How your markdown is read, and the markdown pane
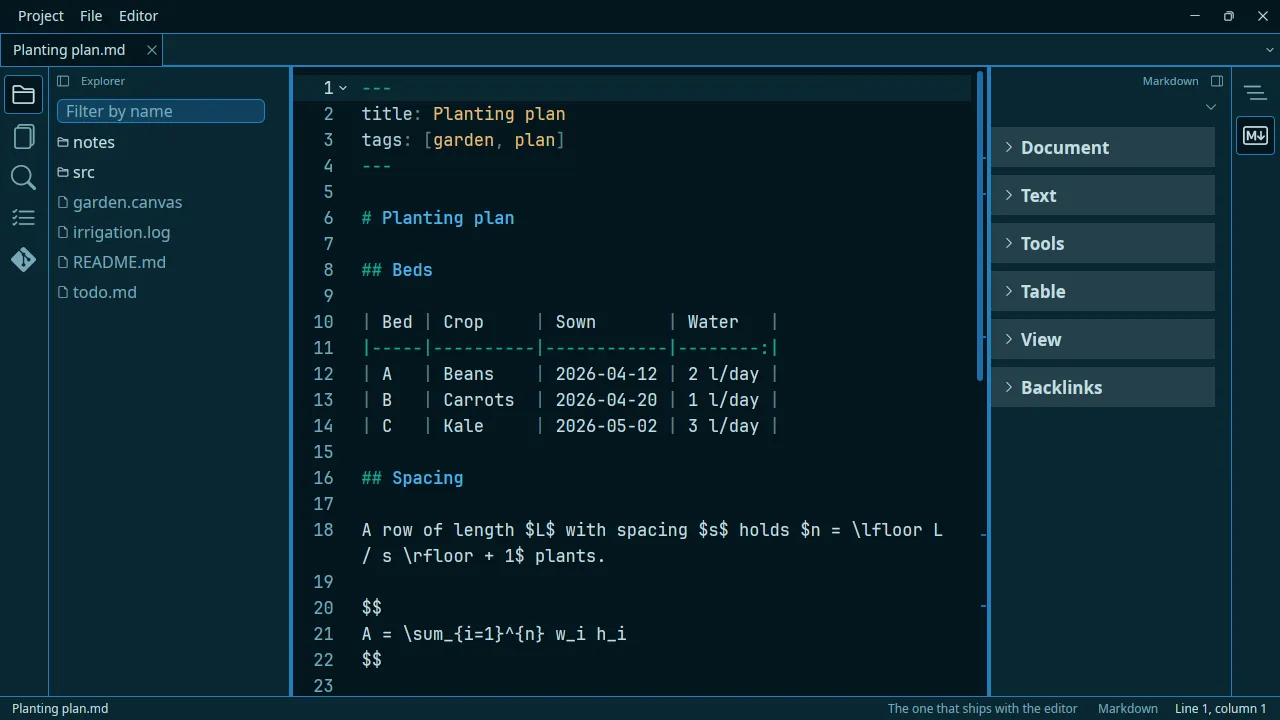
Ctrl+Shift+M opens the markdown pane: every markdown command in
sections — Document (format, spelling, table of contents, paste an image,
export), Text (bold, italic, struck), Tools (characters, formula,
colours), Table, View (the previews) — each with its key, then
Backlinks, and the stylesheet list at the top.
The editor reads GitHub’s markdown and a little more: tables, task lists,
strikethrough, footnotes (written anywhere), alerts (> [!TIP], foldable),
[[wikilinks]] and embeds ![[note]], #tags, front matter properties,
and maths in $…$ and $$…$$ — each described below.
Every extension is on, always. A pipe table is a table, ~~struck~~ is
struck, > [!NOTE] is an alert, $E = mc^2$ is a formula, and a {#my-id} on
a heading is the anchor you can link to. There is nothing to choose and nothing
to switch on.
That is a change of mind. There used to be four flavours — CommonMark, GitHub’s,
mkdocs’ and everything at once — chosen per document, on the argument that a
flavour is a claim about how somewhere else will read this file. The argument
was true and the choice was not worth its weight: somebody who has decided not
to type a definition list does not need an editor that hides definition lists
from them. So the setting, the footer chip, the picker, the flavour: key and
the menu entry are all gone, and what is left is one reading of a document.
What is recognised
| You write | You get |
|---|---|
| a | b | and a |---| row |
a table |
~~struck~~ |
struck through |
- [ ] a task |
a checkbox |
text[^1] and [^1]: a note |
a footnote, and a section at the end |
> [!NOTE] |
an alert with its own colour and icon |
> [!NOTE]+ and > [!NOTE]- |
a callout you can fold away |
[[A note]] and ![[a picture.png]] |
a link to that file, and that picture |
#reading |
a tag, marked in the page |
## Heading {#my-id} |
a heading you can link to as my-id |
Term then : definition |
a definition list |
$E = mc^2$ and $$…$$ |
a drawn formula |
H ~2~ O and x ^2^ |
a subscript and a superscript |
Headings, lists, links, images, code fences, emphasis and block quotes are CommonMark, which is underneath all of it.
The outline, the table of contents and every anchor are read the same way. They come through the same parser with the same extensions, so a heading’s anchor in the outline is the anchor a generated table of contents links to.
The two that are off, and why
Everything pulldown-cmark has, with two exceptions that are decisions rather
than omissions:
- Old-style footnotes are not a third kind of footnote but a different reading of the same syntax, and the two cannot both be on. The modern one is what GitHub draws, so it is the one that is on.
- Smart punctuation rewrites your quotes and dashes —
"like this"becomes“like this”— rather than recognising a construct you typed. This editor does not silently change what you wrote.
One construct that catches prose
Turning everything on has a cost, and it is worth stating rather than discovering. A line beginning with a colon, under a short line, is a definition list:
Term
: this line makes the two of them a definition list
That is the one construct that can claim prose which did not mean it. The rest
were checked and are left alone: ~5 minutes, #12, C# and #1 priority are
all ordinary text, because the delimiters of these extensions may not sit inside
a word.
Which is also the whole rule for ^super^ and ~sub~. H ~2~ O and
x ^2^ are a subscript and a superscript; H~2~O and x^2^ are exactly the
characters you typed.
Alerts
> [!NOTE]
> Useful information that users should know, even when skimming.
Five of them — NOTE, TIP, IMPORTANT, WARNING, CAUTION — each drawn as
a quotation with a coloured rule and its own word above the text, the way GitHub
draws them.
Both stylesheets the editor ships draw them, and so will any stylesheet written
for GitHub’s markup — the page carries the same markdown-alert classes
GitHub’s own pages do.
Folding one away
A + or a - after the bracket makes the callout foldable, which is Obsidian’s
spelling of it:
> [!NOTE]+
> Open, and it can be folded away.

> [!TIP]- A title of its own
> Shut until you ask for it.
+ opens showing the body, - opens shut, and whatever follows on that line is
the callout’s own title in place of the word. A shut callout is not a hidden
one: its body is in the page and in every export, one click away.
A title is markdown, because it is your own prose rather than a keyword:
**bold**, *italic*, `code`, ~~struck~~, a link and an image all
work in it. A title carrying something a one-line heading cannot hold — a
formula, a footnote, a wikilink, a heading — is drawn as the characters you
typed instead of half-rendered.
The heavy preview and an exported page fold them. The preview beside the editor is drawn by a renderer this editor did not write, and shows the marker as the text it is — the same limit every construct of this section meets there.
Tags
#reading, #to-do, #project/kaivalya. A # at the start of a line or
after a space, then letters, digits, -, _ or / — with at least one
character that is not a digit, which is the clause that keeps #12 an issue
number. C# is not a tag either, because the # has a letter in front of it.
A / nests rather than separating, so #project/kaivalya is one tag.
A tag is marked, not linked. This editor has no tag index, so there is
nowhere for a link to go; the editor’s own stylesheet gives a tag a quiet
colour and a rounded background, and the GitHub sheets leave it as text,
because they are carried exactly as published. Finding every document with a
tag in it is Ctrl+Shift+F and the tag itself.
A # inside a code span, inside a fence, inside a URL or in a heading’s
{#anchor} is not a tag — those are read through the parser rather than
searched for in the text.
Properties, if you want them drawn
---
title: A note
tags: reading, rust
css: house.css
---
Front matter is not part of the document: it is an instruction to the editor, which is why it has never been drawn. If the block is where you keep notes about the document rather than settings for it, one setting draws it as a table above the page:
markdown_properties = true
Off by default, and deliberately: with it on, a document whose front matter is
one css: line grows a two-row table at the top of its preview. It changes the
rendered views only — the heavy preview and both exports — and never the text.
Footnotes, wherever you write them
A claim[^why] worth a note.

[^why]: Because of this.
They are collected into a section at the end, however you scattered the
definitions through your document, numbered by the order they are first
mentioned rather than by what you called them — [^why] and [^later] come out
1 and 2 — and each one gets an arrow back to the place it was mentioned.
That is what GitHub does with them, and it is why a footnote defined half way
down your document does not appear half way down the page.
A definition nothing refers to is still printed, last and without an arrow: it is your writing, and there is nowhere for the arrow to go. A reference with no definition stays the text you typed.
One difference from GitHub, and it is the renderer rather than the document: the
brackets GitHub’s stylesheet draws round a reference — [1] — are generated
content, which the preview’s renderer does not draw. The number is there; the
brackets are not. An exported page opened in a browser has them.
In an exported page, hovering a reference says what the note says. The little number carries the footnote’s own text — flattened to a line and cut at two hundred characters — so you can read a note without leaving the sentence. It costs no script and no stylesheet, and it is in every export. The preview shows nothing on hover: its renderer draws no tooltips at all, which is why the arrows back carry their section as visible text rather than as something you have to hover to see.
Maths, drawn rather than described
Inline: $E = mc^2$, in the middle of a sentence.

$$
\sum_{i=1}^n a_i = 0
$$
Drawn as SVG, in the heavy preview and in an exported page. $…$ stays in
its sentence and sits on the line’s baseline; $$…$$ is a block of its own,
centred, with room above and below and its own sideways scroll when a matrix is
wider than the column.
A formula that cannot be drawn is shown as the TeX you typed, never as a gap: a display formula gets the source in a code block with the renderer’s complaint under it, and an inline one gets the source as code, because a complaint in the middle of a sentence is worse than the sentence.
The renderer is pure Rust and ships in the binary, with its own maths fonts — there is nothing to install, no JavaScript, and nothing fetched while you read. An exported page carries the formulae as SVG, so it opens anywhere with no stylesheet, no web font and no script.
A formula is the size of the text around it. It is drawn in em, so it
follows your stylesheet — a paragraph, a heading, a table cell — rather than
being set at a size the editor chose. One setting adjusts it:
maths_scale = 1.1
A ratio rather than a size. 1.0 is exactly the surrounding text’s size; 1.1 is the default because a maths face beside a body face at the same size reads small.
What this does not promise
It is not a promise that your document will render byte-for-byte the way
GitHub or mkdocs build renders it. Nothing can promise that: both are moving
targets, and a good part of what they do is in their renderer rather than in
their parser. What you get here is the generous reading — everything your
document could be — which is the right one when the question is “what did I
write”, and is one construct more than a strict reader elsewhere will show.
Two limits worth knowing:
- The live preview is drawn by somebody else’s renderer. It is
gpui-component’s, whose extensions are not ours to choose, so it is close rather than exact — a fenced block, a table and an alert are what it is worth checking in the heavy preview, which is the renderer this editor owns and the one Export as HTML writes. - Only what you type is read. The editor does not fetch, expand or execute anything in your document: a mermaid diagram is drawn from its fence and a formula from its TeX, and nothing else goes anywhere.
How a document is painted — which stylesheet it is rendered with — is a separate question with a separate answer: choosing a stylesheet.
Other views and tools
The log view
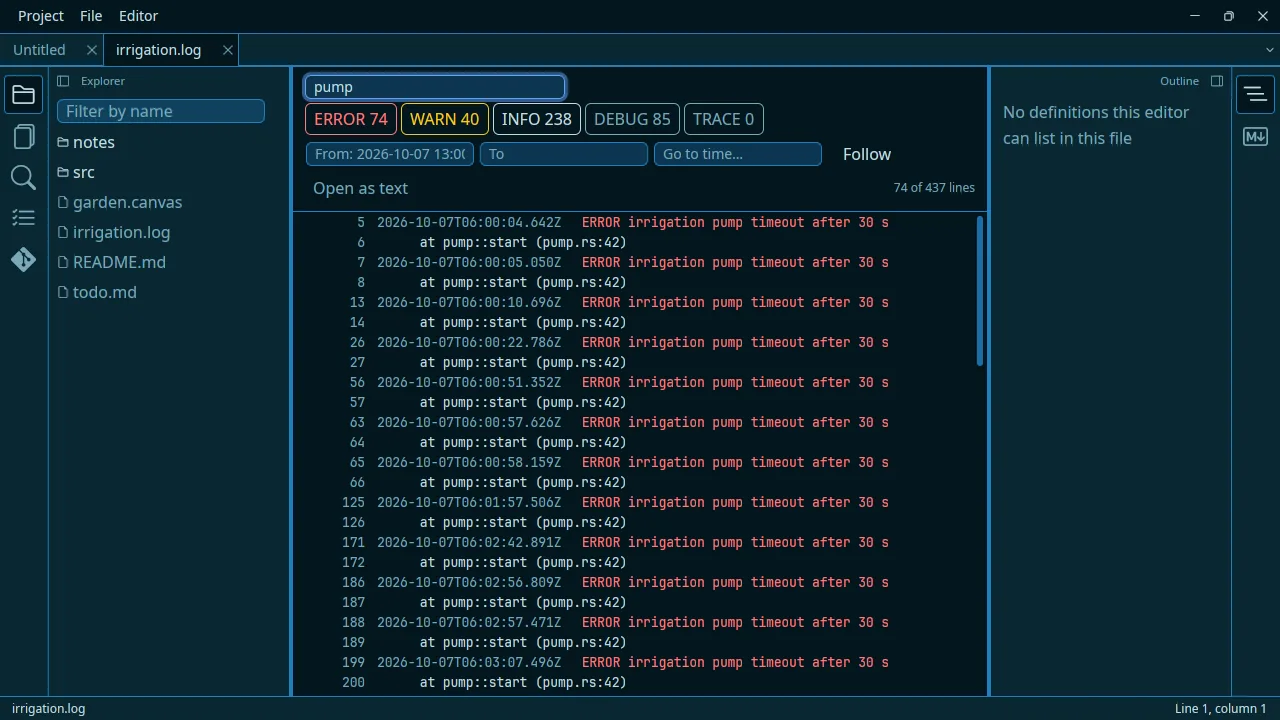
A file ending in .log — or a rotated one, app.log.1 — opens in the log
view rather than as text. Any other file can be shown there with File ›
View as log.
What you see
Each line with its number, its timestamp dimmed, and the rest in the colour of
its level: errors red, warnings amber, information in the text colour,
debug and trace dimmed. The level is found as a word near the start of the line,
however the log writes it — ERROR, [error], level=error, "level":"error",
FATAL, WARNING. A line with no level of its own, such as a stack trace,
belongs to the line above it.
Filtering
- Type in Filter lines… to keep only the lines containing that text, in any case.
- Click a level —
ERROR 12,WARN 40… — to hide or show its lines. Each shows how many lines of the file are at that level. A stack trace stays with its error.
The count of lines shown, out of the file’s, is on the right.
Searching by date
The row under the levels holds three fields.
- From and To keep the lines between two times, together with the text
filter and the levels. Write a day,
2026-10-07, a time on it,2026-10-07 13:00, or — beside an end that has a day — a time alone,13:05. What you write is taken whole:2026-10-07as To is the end of that day,13:05the end of that minute. Either end can be left empty. A field that is not a time is outlined in red and filters nothing. - Go to time… — write a time and press
Enter: the view goes to the first line at or after it, and picks it. Nothing is hidden, so what came before is one scroll up. A time after the log’s last line is said, and the view goes to the end. A time alone is on the log’s last day.
What counts as a line’s time: the timestamp it starts with — ISO
(2026-10-07T13:00:05.123Z, or with a space), in brackets or not, or syslog
(Oct 7 13:00:05, in the year the file was written) — or one a little way in,
after a syslog priority (<6>Oct 7 …) or as a key (time="2026-10-07T…").
A line without one, such as a stack trace, is at the time of the line above
it. Times are compared as written: a log in UTC is searched in UTC.
The jump finds its line by halving the file rather than reading it, which is why it is instant on any size — and why it assumes, as logs are, that the file is written in the order of its times.
Following a log that grows
Follow keeps the last line on screen. Whether it is on or not, the view looks at the file once a second: new lines are read and filtered as they arrive, and a file that became shorter — rotated or emptied — is read again from the start.
Large files
The log view never loads the file into the editor. It notes where each line starts and reads only the lines on screen, so a log of hundreds of megabytes opens in a moment and costs little memory. Filtering reads the whole file once per change of the filter, off the screen’s way — about a sixth of a second for 50 MB.
Back to the text
Open as text opens the file in an ordinary tab, at the line you clicked; double-clicking a line does the same. That reads the whole file into the editor, so for a very large log, stay in the log view.
Whiteboards
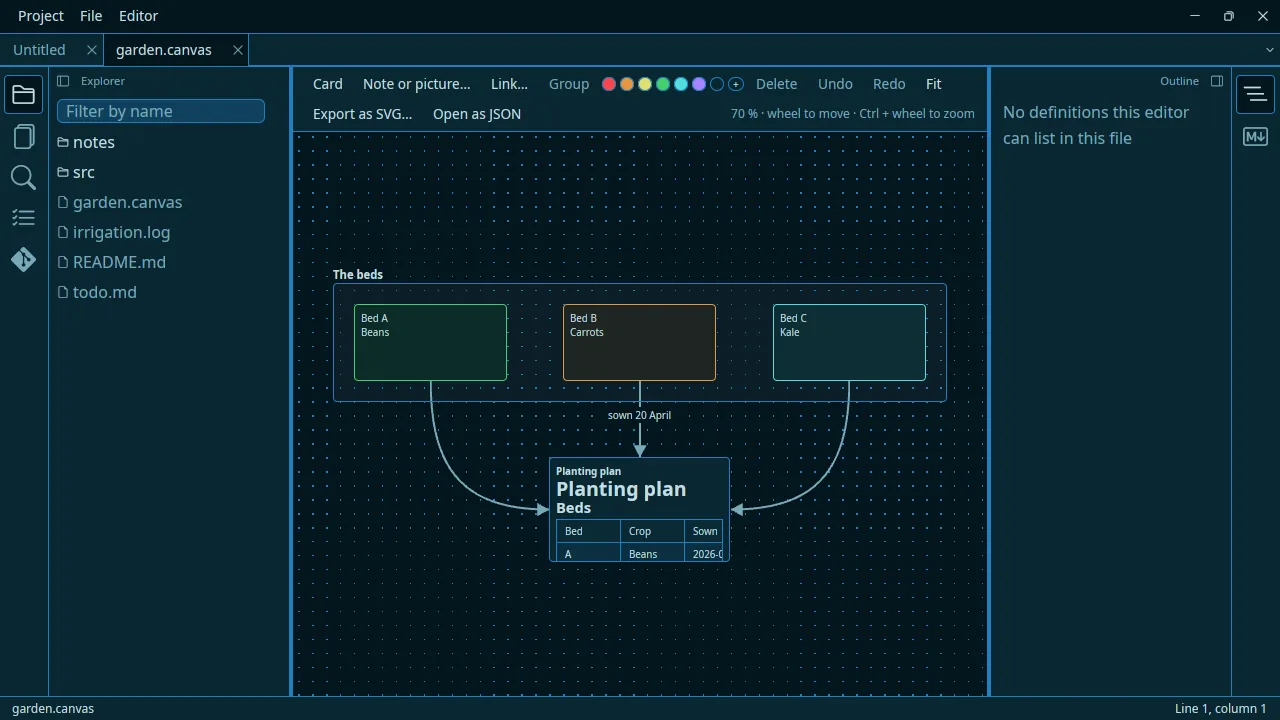
A whiteboard is a .canvas file: cards of text, notes, links, pictures and
groups placed on a plane, with arrows between them. It is the format Obsidian
uses (JSON Canvas), so a board made here opens there,
and the other way round.
Making one, opening one
File › New › New whiteboard (.canvas) makes Whiteboard.canvas in the
project’s root — Whiteboard 2.canvas if that is taken — and opens it. Any
.canvas file opens on the board, from the explorer, the file picker or the
command line. If the file is not JSON Canvas, it opens as text instead, with
the reason in the status bar, so it can be mended; File › Show as whiteboard
puts it back on the board once it is.
The board opens fitted so all of it shows. Its view is not saved: the format has no place for it.
Moving around
| wheel | move the board up and down; Shift + wheel, sideways |
Ctrl + wheel |
zoom, about the pointer |
middle button, or Space held, and drag |
move the board |
Fit, Ctrl+0 |
show all of it |
The toolbar’s right end says the zoom.
Cards
- Double-click an empty place: a card, there, ready to type in. Its text
is markdown, as Obsidian’s is, and is drawn as markdown — headings, emphasis,
lists, task boxes, links, code and tables — at the board’s zoom.
Escape, or a click elsewhere, puts it on the board — a card left empty is not kept. Zoomed out so far that its words would be a few pixels high, a card shows its frame alone. - Double-click a card to type in it again, a group’s name to rename it, an arrow to give it a label.
- Card in the toolbar makes one in the middle of the view.
- Drag a card to move it.
Shift+ click adds to the selection; dragging across an empty place selects everything wholly inside the box. - Drag the square at a selected card’s corner to resize it.
- The colours in the toolbar colour what is selected — cards and arrows;
the empty circle takes the colour off. The six are Obsidian’s presets.
+opens the colour window for any other colour: pick one and Insert colours the selection, saved as#rrggbb, which Obsidian draws too. A card’s colour is its border and a faint fill; its text keeps the board’s text colour.
Arrows
A card under the pointer, or selected alone, shows a small circle on each side. Drag from one to another card: an arrow, from that side to the side facing it — or to the side whose circle you let go on. Let go anywhere else and nothing is made.
Groups
Select cards and press Group (Ctrl+G): a frame round them, behind them,
its name typed at once, in a field drawn above the cards. Drag a group by its name and what it holds moves
with it. Deleting a group leaves what it held.
Notes, links and pictures
- A note is a card that shows its beginning: drag a file from the explorer onto the board, drop one from the file manager, or choose it with Note or picture…. Double-click the card to open the note in the editor.
- A picture, the same ways. A picture already in the project is used where
it is; one from elsewhere is copied into the folder pasted images go to
(
paste_image_folder,imagesby default). - A link card opens its address in your browser on a double-click.
Paste an address on the board —
https://…,mailto:…, alone — and it becomes one; or press Link…, type the address in the field that opens in the toolbar andEnter(example.orgis taken ashttps://example.org). The card shows the address: the editor never fetches a page to preview it.
The board names a file from the project’s root, as Obsidian does from the vault’s — so open the vault as a project. A note from outside the project is refused, and the status bar says why.
A map with pins is these together: put your map in as a picture, and small note cards on it where the places are; each opens its note.
Keys
Delete, Backspace |
delete what is selected; an arrow to a deleted card goes with it |
Ctrl+Z, Ctrl+Shift+Z or Ctrl+Y |
undo, redo — also in the toolbar |
Ctrl+C, Ctrl+X, Ctrl+V |
copy, cut, paste — what is copied is JSON Canvas, so it pastes into Obsidian too; text from anywhere else pastes as a card |
Ctrl+A |
select everything |
Ctrl+G |
group what is selected |
| arrows | move what is selected 10 units; with Shift, 1 |
Enter |
type in the card or arrow selected |
Escape |
stop typing; with nothing being typed, select nothing |
Saving, and the file
The board is written to its file after every change, as Obsidian writes one: a line per card and arrow, so a change to a card is a change to its line in git. Anything the editor does not understand in a file Obsidian wrote — a field, a kind of node — is written back unchanged.
If the file cannot be written — the disk is full, the folder is read-only — the change stays on the board, the tab is marked as unsaved and the status bar says why. File › Save tries again; closing the tab asks first.
Open as JSON in the toolbar opens the file as text beside the board. Save it there and the board reads it again; so does a change made by anything else, Obsidian included.
Exporting
Export as SVG… writes the board as one picture, in the colours it is drawn in: any browser, image viewer or document opens it. Pictures on the board are inside the file, so it can be sent alone.
Settings
whiteboard_background |
the colour behind every board: "", the default, for the theme’s own, or "#rrggbb". The cards are filled from it |
whiteboard_text |
the colour of the board’s text — cards, labels, the exported picture: "" for the theme’s, or "#rrggbb". Change it with the background when the theme’s text would not read on it |
whiteboard_grid |
a grid of dots behind the cards, true by default |
Obsidian’s file keeps no background, so these are the editor’s, for every board; Obsidian draws its own.
The panes and the rail
The explorer, the open files, the search and the outline — and the markdown, characters and colour panes besides — each have a setting for which edge they are on and whether they are offered at all:
explorer_side = "left"    # or "right"
search_side   = "left"    # or "right"
outline_side  = "right"   # or "left"
show_explorer = true
show_search   = true
show_outline  = true
A setting each rather than one layout mode, so every arrangement is available, including all three on the same edge.
An edge shows one pane, and every pane of that edge has an icon in a narrow rail beside it. The open one’s icon is pushed in; the others are out. Click a released icon and its pane opens, pushing that icon in and releasing the one that was. Click the pushed one and the edge folds down to the rail, releasing it. A sidebar is never shared, and never divided.
Hover a released icon and that pane opens over your text, without moving
anything — the window stays exactly as it was, and the panel goes when the
pointer does. A drag that starts in it is not the pointer leaving: pull a
slider of the colour pane out over the text and the panel stays until you let
go. That is for looking something up; clicking is for working in it.
The pushed icon does not do this, because its pane is already there. If panes
opening under a passing pointer get in your way, peek_on_hover = false makes
the rail answer clicks only.
The icons sit in the order rail_order gives, one list for both edges, and
the first pane of an edge is the one it opens on:
rail_order = ["explorer", "files", "search", "todo", "git", "outline", "markdown", "characters", "colour"]
A pane you leave out of the list comes after the ones you name.
rail_icon_size sets how big the icons are, in pixels from 12 to 40 — 20
unless you say otherwise — and the rail is as wide as they need.
Drag the seam beside a pane to change its width. The button in a pane’s header folds that edge down to the rail as well. Folded is not closed — a pane you close through the menu stays closed until you ask for it again.
show_<pane>offers a pane or not,<pane>_sideputs it on the left or the right — for the explorer, the open files, search, TODO, git, outline, markdown, characters and colour.rail_orderis the order of the icons, one list for both edges;rail_icon_sizetheir size;peek_on_hover = falsemakes the rail answer clicks only.- The colour and character tools open as windows by default
(
colour_as,characters_as="window"or"pane").
Languages, highlighting, wrapping
Alt+Z(File › View › Wrap long lines) wraps lines at the window’s edge. Setting:soft_wrap.- File › View › Show invisible characters shows spaces and tabs.
Setting:
show_invisibles. - The language — which decides the colours, the outline and the formatter — comes from the file’s name. Click it in the footer, or File › Language…, to choose another for this file while it is open. A new file is markdown until it is saved under another name.
Which files are highlighted
Eighteen languages ship:
| Extension | Language |
|---|---|
.md, .markdown |
markdown |
.rs |
rust |
.py, .pyi |
python |
.sh, .bash, .zsh, and .bashrc, .bash_profile, .profile, .zshrc |
bash |
.js, .mjs, .cjs, .jsx |
javascript |
.ts, .mts, .cts |
typescript |
.tsx |
tsx |
.html, .htm |
html |
.css, .scss |
css |
.json, .jsonc |
json |
.yaml, .yml |
yaml |
.toml |
toml |
.go |
go |
.java |
java |
.php |
php |
.xml, .xsd, .xsl, .xslt, .svg |
xml |
.vue |
vue — and its three blocks, each in its own language |
.properties |
read as toml — see below |
| anything else | text — not coloured |
| no file — the untitled buffer | markdown |
A file whose whole name is the type carries no extension and is still
recognised: .bashrc is a shell script.
A .vue file is three languages at once. The grammar colours the
single-file-component structure — <template>, the tags and directives inside
it, v-if, :title, @click — and hands each block to the language it
declares: TypeScript or JavaScript inside <script>, CSS inside <style>.
That is the same mechanism an HTML file’s <script> and <style> already use,
and it works for the same reason.
A properties file is read as TOML, which has the shape that matters —
key = value a line at a time, # comments — so keys, separators, comments,
numbers and quoted strings all colour. What it does not colour is an unquoted
value, because TOML wants a string in quotes. That is the whole of the
difference, and it costs no extra grammar.
Fenced code inside a markdown file is coloured with the fence’s own language
when that grammar is present, so a ```rust block is highlighted as
Rust.
What is coloured in markdown source
The text you write, not only the code in it. A grammar hands back what it finds
and a theme paints what it knows, and where those two lists disagree the text
is simply left plain — which is why a block quote used to look exactly like the
paragraph under it, with only its > in a colour.
| Headings | The text, and the # markers in their own colour |
| A block quote | The whole quote leans — italic, and no colour of its own, so emphasis and links inside it keep theirs |
| Task boxes | [x] and [ ] are drawn as values, which is what they are |
| Tables | The ` |
| Struck text | ~~like this~~ is muted, because a colour is all a highlighter here can change |
| Escapes | \*, & and { — the three ways of saying “this character is not markup” |
| Links | The text one colour, the URL another, reference labels like link text |
| Code | A span inline; a fenced block in its own language |
A block quote is italic rather than coloured, and that is deliberate. Two styles that both want to set a colour over the same text are resolved by the framework in an order nothing here controls, so a quote that took a colour would sometimes win against the emphasis inside it and sometimes lose. A slant is not in that contest: it composes with every colour instead of competing with one.
When the language is decided
From the file’s extension, every time the name can change:
- when you open the editor on a file from the command line;
- on File > Open;
- on File > Save As, if you save under a name with a different extension.
A new file is markdown
An untitled buffer — Ctrl+N, or the editor started with no file — is coloured
as markdown, and the markdown pane, the preview and the markdown commands work
in it from the first keystroke: this is a markdown editor, so a file with no
name yet is most likely one. Save it under another extension, or open a file
into it, and it takes that language instead.
When the name lies
The language is in the footer, on the right, and a click on it changes it. So is File > Language…. The list is every language the editor colours, and From the file’s name at the top puts it back. The choice is for this file while it is open — a correction, not a rule about a kind of file — and a Save As drops it, since a new name is a new answer. Everything that asks what a file is follows it: the colours, the outline, the markdown pane and Format this file. When a choice is in force the footer says it in the brighter colour.
Nothing looks inside a file to guess its language; the name decides, and you correct it.
What is not there yet
A <style> or <script> inside an HTML file is not coloured as CSS or
JavaScript; the HTML around it is. A fenced code block inside a markdown file
is coloured with its own language, so this is one language’s gap rather than
a rule.
Themes
The editor ships seven themes, one file each:
| Kaivalya Light | Off-white paper, warm ink. What theme = "light" means. |
| Kaivalya Dark | A warm dark grey, amber headings. What theme = "dark" means. |
| Kaivalya Night | A deeper, cooler grey with blue headings and green code. Chosen by name. |
| Kaivalya Kiln | The website’s own palette: warm white, warm greys, and its hot red. Chosen by name. |
| Kaivalya Ember | The same reds over a warm dark, with olive strings. Chosen by name. |
| Kaivalya Red | The window itself in red: red chrome, red borders, orange buttons. Chosen by name. |
| Kaivalya Blue | The same, in the Trainer’s teal and blue. Chosen by name. |
The first three are quiet on purpose. Kiln and Ember are the coloured pair,
built from the reds this project’s website is drawn in — #cc3311 over warm
paper, #d2401a over a charcoal with a red cast — and, with Red and Blue, the
only ones that name an accent colour at all, so a selected menu row is a warm
tint rather than a grey one.
Red and Blue put the colour in the window rather than in the text, which is
the difference between them and the pair above. The status bar, the menu bar
and the panes are a deep red or a deep navy, the borders and the scrollbar are
the accent itself, a button you can press is orange or blue, and the code is a
full palette rather than a warm one. Blue takes its two accents from the
Kaivalya Trainer — #12a892 and #1e7fc0 — with the
green-greys that go with them, so it is a different family and not this palette
hue-rotated.
They meet every contrast band the quiet themes meet, because the bands are about lightness and a hue is free. That is also why they are as saturated as they are: the only way to make a window read as red is to spend the whole of the colour budget on hue, since the lightness is spoken for.
One thing Red has to do that the others do not: its error colour is amber, not red. In a window this red, an error drawn in red is not an error, it is more window. Blue has no such problem and keeps a red one.
Kaivalya Blue is what the editor opens in. It is a choice rather than a
neutral start: this editor is one of a pair, and the blue is the Trainer’s.
"system" is one line away if you would rather it followed your desktop, and
then it is light or dark with the rest of your screen:
theme = "Kaivalya Blue"    # the window in the Trainer's blue. The default.
# theme = "system"         # follow the desktop, light or dark
# theme = "light"
# theme = "dark"
# theme = "Kaivalya Night" # or any theme by name
# theme = "Kaivalya Ember" # the coloured dark one
# theme = "Kaivalya Kiln"  # the coloured light one
# theme = "Kaivalya Red"   # the window in red
A project’s own themes
A project can bring themes of its own in .kaivalya/themes/, the same JSON
files. They are added to yours while the project is open, a theme with the
same name as one of yours wins, and theme = "…" — yours, or the project’s own
settings — can name one.
Where they live
~/.config/kaivalya-editor/themes/, beside your settings file, one file per
theme:
kaivalya-light.json   kaivalya-kiln.json    kaivalya-red.json
kaivalya-dark.json    kaivalya-ember.json   kaivalya-blue.json
kaivalya-night.json   kaivalya-theme.schema.json
Those files belong to the editor, and are rewritten every time it starts — so improvements to the themes it ships actually reach you. Editing them is therefore not the way to change your colours: your edits would go on the next start.
A theme of your own is a different file, dropped in the same directory, and
nothing touches it. That is the whole rule: kaivalya-*.json is ours, everything
else in there is yours.
The directory is watched, so saving any of it changes the colours without restarting.
What every value does
JSON has no comments. Not “discouraged” — there is no syntax for one, and the
parser refuses //. So a theme file cannot explain itself the way your
settings.toml does, and a hundred colours with names like popover.background
tell you what a thing is called and not what it paints.
kaivalya-theme.schema.json, in the same directory, is where the explanation
lives instead. It is a JSON Schema, and every key in it carries a
description of what changes on screen when you change it:
popover.background— Everything that floats above the page: the menus, the find bar Ctrl+F opens, the tooltips, the notifications, the stylesheet switcher. Worth naming even in a plain theme, because the fallback is a trap: leave it out and a menu is the same colour as the page under it, with nothing but a one-pixel border to say where it starts.
Every theme file’s $schema line points at it, so an editor that reads that
line shows you the description while you type — completion on the key names,
the explanation on hover. Including this one: it is a .json file like any
other.
Writing your own
Copy any kaivalya-*.json to another name in the same directory, edit it, and
name your theme in your settings. Copy rather than edit in place, for the reason
above.
The format is the toolkit’s own — not a standard. Two things worth knowing if you are bringing colours from elsewhere:
- The
highlightblock is Zed-shaped. The toolkit’s own source says that section is “compatibility withstylesection in Zed theme”, so a Zed theme’s syntax colours port across almost mechanically. - A VS Code theme does not. It is not just a different file layout: VS Code
colours TextMate scopes (
entity.name.function.rust) and this colours tree-sitter capture names (function,punctuation.list_marker). The two vocabularies do not line up, so bringing one over means choosing what maps to what.
A theme file holds a set:
{
  "$schema": "./kaivalya-theme.schema.json",
  "name": "My themes",
  "themes": [
    { "name": "My Light", "mode": "light", "highlight": { "syntax": { } } }
  ]
}
Keep the $schema line: it is what makes your editor explain the keys back to
you while you write them.
Two things worth knowing:
- You only have to write what you want to change. Anything a theme leaves
out falls back to the toolkit’s own colour for that mode, which is how the
shipped themes work: they set the
syntaxblock and inherit the rest of the interface. Six entries rather than forty. - A file that will not parse is skipped, not fatal. The editor logs it and carries on with the themes that do parse, so a half-finished theme in the directory cannot stop the editor opening.
The surfaces that float
Beside syntax, a theme’s colors block names the interface’s own colours, and
one of them is worth calling out because its fallback is a trap.
popover.background is the colour of everything that floats above the page —
the find bar Ctrl+F opens, the menus, the tooltips and the notifications. A
theme that leaves it out gets the page’s own background, so a menu has nothing
but its one-pixel border to say where it begins, and the find bar has that and
nothing else.
The shipped themes name it: a step away from the paper rather than a different colour — warmer and darker in Kaivalya Light, lighter in the two dark ones.
"colors": { "popover.background": "#efeade" }
The tab strip
The tabs have the same trap, and it caught the shipped themes: tab.background,
tab.active.background and tab_bar.background all fall back to the page’s own
background. A theme that names none of them draws the strip, the inactive tabs,
the active tab and the document in one colour — which is to say the active tab
is not marked at all.
The shipped themes take the arrangement every editor has settled on: the active tab is the page, and the strip steps away from it. The tab and the document below it read as one surface, so nothing has to be compared; the strip and the inactive tabs sit a step away — darker in Kaivalya Light, lighter in the two dark ones, since there is no room underneath a paper as dark as Kaivalya Night’s. The labels follow: quiet on the strip, the page’s own ink on the tab that is open.
"colors": {
  "tab_bar.background": "#f2eee4",
  "tab.background": "#f2eee4",
  "tab.active.background": "#fdfdfb",
  "tab.foreground": "#5f5c55",
  "tab.active.foreground": "#33333a"
}
The strip is only drawn when more than one document is open.
What syntax controls
The names in the syntax block are what the grammars emit, and these are the
ones a markdown file is made of:
title |
A heading’s text |
punctuation.special |
A heading’s # |
punctuation.list_marker |
A list’s * or - |
punctuation.delimiter |
A quote’s >, a table’s |, the marks around emphasis |
emphasis, emphasis.strong |
Italic and bold |
link_text, link_uri |
A link’s label and its address |
text.code.span |
Backticked code inside a sentence |
text.literal |
A fenced code block |
Each takes a color, and optionally font_weight and font_style:
"punctuation.list_marker": { "color": "#9A4A1E" },
"title": { "color": "#0433FF", "font_weight": 600 }
A name you leave out is not painted — it is drawn in the ordinary text colour, which looks like a language that is not highlighted rather than like a theme that is short an entry. That was true of the punctuation names in the toolkit’s own themes, and fixing it is why this editor ships two of its own.
What a theme does not decide
The markdown preview’s appearance is a stylesheet rather than a theme — see
choosing a stylesheet. Those live in styles/ beside this
directory and work the same way: the editor writes what it ships and touches
nothing else. The default is GitHub’s own, which follows your light or dark
setting; one you wrote is used exactly as written.
Sizes and fonts
Three sizes, for three parts of the window — and the panes’ own,
pane_font_size, is a third setting rather than a wider second:
font_size = 17.0            # the prose you write
interface_font_size = 16.0  # the menus and the tabs
pane_font_size = 16.0       # the explorer, the outline, the search results
How big a list of file names should be is not the same question as how big your prose should be, nor how big the menus should be — and until you could say so, the panes were 12.8 pixels, the smallest thing in the window and the only one you could not change. Those three numbers are the defaults, and the one thing worth keeping when you change them is the order: a pane quieter than your prose, because a file tree as loud as the text is a lot of window given to file names.
The table grid is not a pane: its cells follow font_size and its buttons
interface_font_size.
Which font each of them is in
The same three questions, with names instead of numbers:
font_family = "JetBrains Mono"   # the prose you write
interface_font_family = "Inter"  # the menus and the tabs
pane_font_family = "Inter"       # the explorer, the outline, the search results
Leave interface_font_family out and the menus are in IBM Plex Sans if it is
installed, otherwise in the first font of the framework’s own list — Ubuntu,
Noto Sans, DejaVu Sans… — that has a bold of its own (F242: a variable font is
drawn at one weight, so its bold would never show). pane_font_family left out follows
interface_font_family, because a pane is part of the interface. The text’s
own has a default: font_family = "JetBrainsMonoNL Nerd Font Mono", for the
reason below; NL is the variant without ligatures, so <!-- and --> stay the
characters you typed. font_family = "" goes back to the desktop’s monospace.
An emoji is in colour in your text only if the text font does not have its
own. ❤, ☺ and ✔ are in many fonts as plain symbols, and the editor uses the
text font’s own glyph before it reaches the colour emoji font — DejaVu Sans
Mono, the usual default, has a grey ❤. A font without them, such as JetBrains
Mono, leaves them to the emoji font: font_family = "JetBrains Mono" and ❤️ is
red. The panes, the quick preview, the heavy preview and an export draw it in
colour whatever your text font.
A name nothing on this machine answers to is said out loud, in the status bar, and the editor keeps drawing in the font it had. Falling back quietly is how somebody spends an afternoon wondering why their setting did nothing.
Any font installed here will do — these are family names as your system lists them, not file paths.
Settings and language
Ctrl+, (Editor › Settings file) opens
~/.config/kaivalya-editor/settings.toml; every option in it says what it
does. Save, then restart the editor. Editor › Reset the settings file
puts the defaults back and keeps yours as settings.toml.bak. locale
("en-US" or "fr-FR") chooses the editor’s language; left out, it follows
$LANG. See Change a setting and
Every setting.
Appendices
Three lists, each on a page of its own, written from the editor’s own tables every time the site is built — so they say exactly what this version does.
Every setting
Each option of the settings file, what it does and what it is when you have not changed it. Every setting →
Keyboard shortcuts
Every command, the keys that run it and the menu it is in. Keyboard shortcuts →
The / catalogue
Every row the / palette offers, what it writes, and the other words it
answers to. The / catalogue →